![fidesic-logo-300px-2023-2.png]](https://help.fidesic.com/hs-fs/hubfs/fidesic-logo-300px-2023-2.png?height=40&name=fidesic-logo-300px-2023-2.png)
The MagiCapture settings page decides what MagiCapture does with the invoices you email to it or send to it from the Invoice Inbox: which files it accepts, how it fills in dates, amounts and numbers, how it codes accounts, and which location it picks. This article goes through every setting on the page, in the order the page shows them.
New to MagiCapture? Start with How to Get Started with MagiCapture Ocr, and see the Fidesic Invoice OCR Best Practices Guide for getting the best results from it.
Who can do this: users whose role has Manage Company Profile, in companies with Accounts Payable.
Finding your way around the page
Go to Settings → Accounts Payable → MagiCapture. The settings are grouped into four sections: What MagiCapture Accepts, Dates, Amounts and Numbers, Account Coding and Locations.
- Type in Search settings to show only the settings that match. Click a section's name beside the search box to jump to it, or click a section's heading to fold it away.
- Each setting says in a sentence or two what it does. Learn more opens a help article with the details.
- A setting that only works with another one turned on says so, for example Needs Capture PO Numbers turned on. Click the link to go to that setting, even when it's on another page.
- Switches save as soon as you flip them. For a text box, click Save. A fallback term or location saves as soon as you pick it from the list.
Changes apply to the next invoice MagiCapture reads. Invoices it has already read aren't changed.
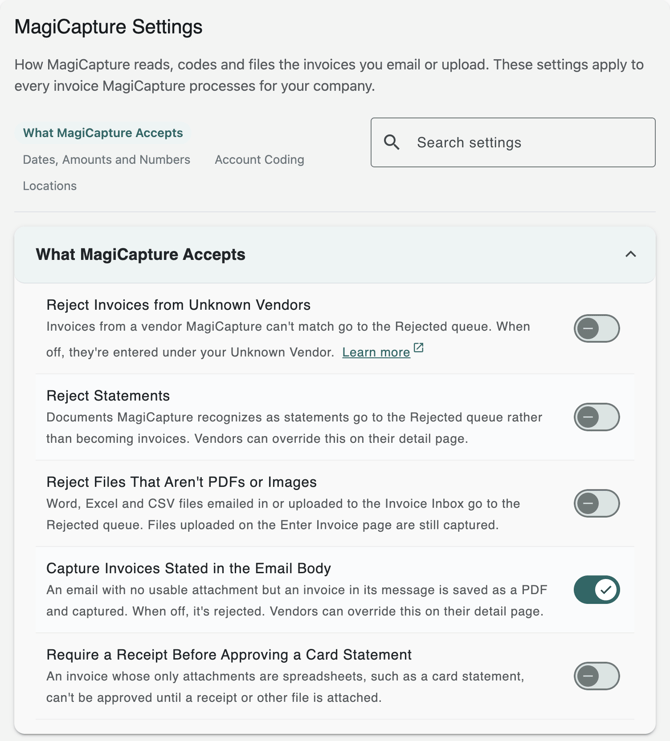
What MagiCapture accepts
MagiCapture reads these files:
- PDFs
- images: TIFF, PNG and JPEG
- Word documents: .doc, .docx and .rtf
- spreadsheets: .csv, .xls and .xlsx, such as a card statement
It can also read an invoice typed into the body of an email that has no attachment it can use (see Capture Invoices Stated in the Email Body below). A file it can't read at all, such as a text file, always goes to Rejected Docs. The settings in this section reject more.
A file you upload on Enter Invoice and submit to MagiCapture is never rejected by these settings. MagiCapture reads it and gives you what it found to finish, because you're already looking at it.
Reject Invoices from Unknown Vendors
When MagiCapture can't match the vendor on an invoice to one of your vendors:
- Off (the default): the invoice is entered under your Unknown Vendor, the vendor whose vendor ID is UNKNOWN (or UNKNOWN VENDOR), with the note "No vendor match was found". If you have no Unknown Vendor, the invoice waits in the Invoice Inbox as Partially Captured for someone to pick the vendor.
- On: the invoice goes to Rejected Docs with the note Reject Unknown Vendor.
Change it when you get many emails that aren't invoices from your vendors, such as marketing or order confirmations, and would rather review them in Rejected Docs than clear them out of the Unknown Vendor's invoices.
Reject Statements
Some documents MagiCapture reads are vendor statements, not invoices.
- Off (the default): a statement becomes an invoice like any other. Statements rarely carry an invoice number, so MagiCapture makes one up (see Document Number Format).
- On: statements go to Rejected Docs with the note Reject All Statements.
Change it when your vendors send statements alongside their invoices and you don't pay from them. If a few vendors bill you by statement, leave this on and turn Reject Statements off for those vendors on their own page (see Settings a vendor can override, below).
Reject Files That Aren't PDFs or Images
- Off (the default): MagiCapture reads Word documents and spreadsheets as well as PDFs and images.
- On: Word, Excel and CSV files that are emailed in, or sent to MagiCapture from the Invoice Inbox, go to Rejected Docs with the note Only PDF and image files are accepted. The Invoice Inbox also stops offering to send spreadsheets to MagiCapture. Files uploaded on Enter Invoice are still read.
Change it when your vendors attach spreadsheets or Word files that aren't invoices, such as price lists, remittance details or delivery schedules, and you only want MagiCapture to make invoices from PDFs and images.
Capture Invoices Stated in the Email Body
Some vendors type the invoice into the email itself instead of attaching it. This setting decides what happens to an email with no attachment MagiCapture can use. An attachment doesn't count when it's only a signature image or logo.
- On (the default): if the subject mentions an invoice, bill, statement, remittance, receipt or amount due, and the message has enough text and numbers to hold an invoice, MagiCapture saves the message as a PDF named after the subject (for example Email-body-Invoice-4471.pdf) and reads it like any other invoice. Images embedded in the email, such as the vendor's logo, go on the page too, which helps MagiCapture recognize the vendor.
- Off: the email isn't read. The sender gets an automatic reply saying no attachments were found and asking them to send the invoice as a PDF or image.
You can also set this per vendor with Capture Email Body on the vendor's page. A vendor with it off has its email-body invoices sent to Rejected Docs with the note Email Body Capture Disabled. A vendor with it on is captured even when this company setting is off. Then every email-body invoice is read, and other vendors' go to Rejected Docs instead of getting the automatic reply.
Change it when email-body capture is turning ordinary correspondence into invoices. Turning it off for just the vendors who cause that is usually better than turning it off for everyone.
Require a Receipt Before Approving a Card Statement
- Off (the default): an invoice can be approved whatever files are attached to it.
- On: an invoice whose only attachments are spreadsheets (.csv, .xls or .xlsx), such as a card statement, can't be approved until a receipt or another kind of file is attached. If it would otherwise be approved automatically, it's held for the person who submitted it at a Receipt Required stage that reads "Receipt Required: attach a receipt to this card statement, then approve".
Change it when your policy is that every card charge needs a receipt on file. See Import a Bank of America card statement.
Dates, amounts and numbers
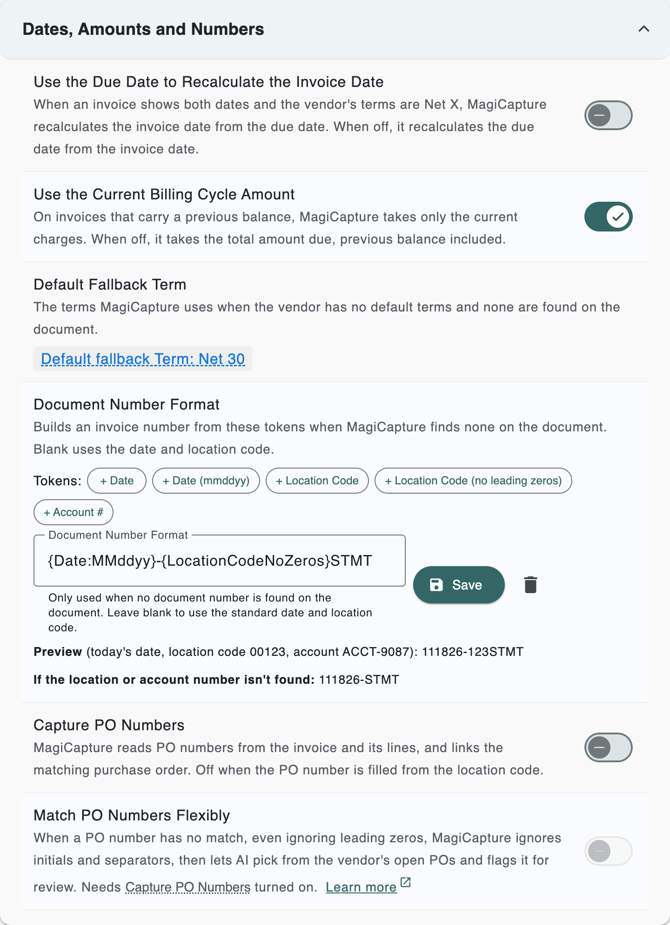
Use the Due Date to Recalculate the Invoice Date
When an invoice shows both an invoice date and a due date, and its terms are a number of days (Net 30, for example), the two dates have to agree with the terms. This setting decides which date MagiCapture trusts.
- Off (the default): the invoice date stands, and the due date is recalculated from it. The invoice gets the note "The due date was adjusted to be consistent with the invoice date and selected term".
- On: the due date stands, and the invoice date is recalculated from it, with the note "The document date was adjusted to be consistent with the due date and selected term".
Terms due on a set day, such as the 10th of next month, always recalculate the due date from the invoice date.
Change it when your vendors' due dates are right but their invoice dates aren't what you want to record, for example invoices dated when they were printed rather than when the service was billed.
Use the Current Billing Cycle Amount
Some invoices, such as utility bills, show this period's charges plus a previous balance still owed.
- On (the default): MagiCapture takes only this period's charges. A note on the invoice gives the previous balance and the total due.
- Off: MagiCapture takes the total amount due, previous balance included, with a warning note giving the current charges alone.
Change it when you pay the whole balance due on each bill rather than each period's charges. Leaving it on avoids paying a previous balance twice.
Default Fallback Term
MagiCapture takes an invoice's terms from the vendor's default terms first, then from terms printed on the invoice. When neither gives terms, it uses this one, and the invoice gets the note "No vendor terms found, falling back to the default term".
- Default: None. Without a fallback, MagiCapture uses the terms on the vendor's last approved invoice.
To set it, click Default fallback Term, type to search your terms, and pick one. To clear it, click the X in the box.
Change it when many of your vendors have no default terms and you want their invoices on one standard term, such as Net 30.
Document Number Format
When MagiCapture finds no invoice number on a document, typically a statement or a utility bill, it makes one up. This setting decides how.
- Blank (the default): the number is the invoice date as yyyymmdd, with a period and the location code added when the invoice has a location, for example 20261118.101.
- A format: the number is built from text you type and tokens you add with the buttons:
- + Date adds the date on the document as yyyymmdd.
- + Date (mmddyy) adds it as mmddyy, for example 111826.
- + Location Code adds the invoice's location code as stored, for example 00123.
- + Location Code (no leading zeros) adds it without leading zeros, for example 123.
- + Account # adds your account number with the vendor, read from the document or the vendor record.
The Preview under the box shows what today's number would be. If the location or account number isn't found on an invoice, that token is left out, and the second preview line shows the result. If nothing usable would be left, the standard number is used. The invoice gets the note "No document number was found, using your company's document number format". Click Save to keep a format, or the bin to go back to the standard number.
Change it when you want made-up numbers to follow your own pattern, for example {Date:MMddyy}-{LocationCodeNoZeros}STMT for statements, which gives 111826-123STMT.
Capture PO Numbers
- Off (the default): MagiCapture doesn't fill in PO numbers.
- On: MagiCapture reads the PO number from the invoice. With Use Purchase Orders turned on, it also reads PO numbers from the invoice's lines, for invoices that bill several POs, and links the invoice, or each line, to the matching purchase order, ignoring leading zeros the vendor left off, and adds a note such as "PO 4500123 was automatically linked". A PO number that matches none of the vendor's POs gets the note "PO number … was captured but no matching PO was found".
The switch is greyed out when your company fills the PO number from the location code (Fill PO Number with the Location Code in Preferences).
Change it when your vendors print your PO numbers on their invoices. See Use purchase orders in Fidesic.
Match PO Numbers Flexibly
Needs Capture PO Numbers and Use Purchase Orders turned on.
- Off (the default): a PO number has to match one of the vendor's POs, apart from leading zeros.
- On: when there's no such match, MagiCapture tries again ignoring buyer initials before the number, a letter suffix after it, and separators such as dashes, as long as exactly one of the vendor's POs fits. If that fails, AI picks from the vendor's open POs by number and lines. A confident pick is linked with the note "PO number … was matched to PO … by AI: check it is the right PO". A less certain one is only suggested, with the note "Possible match: PO …".
Change it when vendors write your PO numbers in their own way, for example JL-4500123 or 4500123-B for PO 4500123. See Import invoice lines from a purchase order.
Account coding
MagiCapture codes an invoice from the first of these that gives it accounts: account codes written on the invoice, AI account suggestions (where Fidesic support has turned them on), the vendor's default accounts, the vendor's single recurring purchase line, and then the vendor's last approved invoice. Invoices linked to a purchase order are coded from their PO lines instead. See Charge accounts from PO lines.
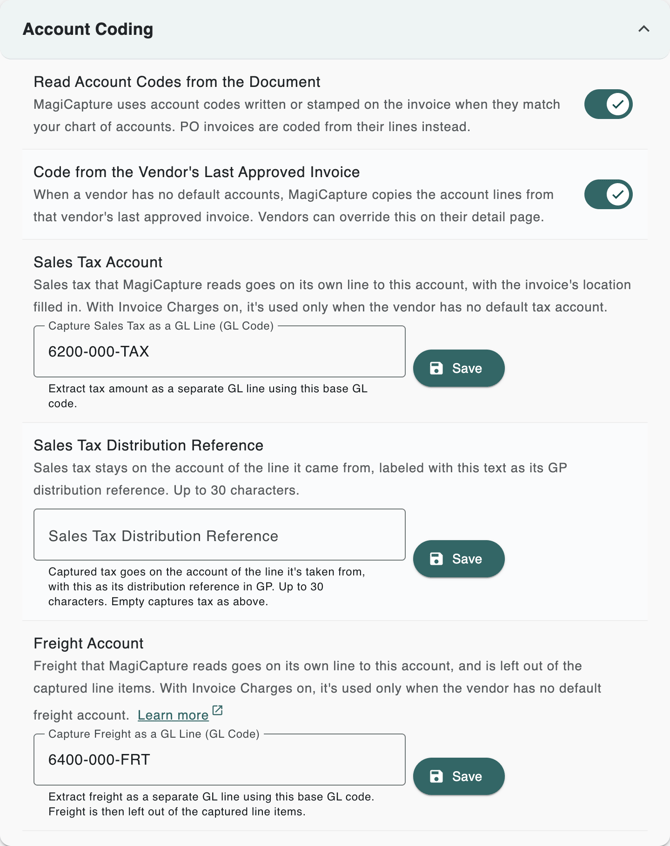
Read Account Codes from the Document
- On (the default): account codes written or stamped on the invoice are used when they match your chart of accounts, with the amounts written next to them. With no amounts, the whole invoice goes to the first code. A code that matches no account is left off, with a warning note naming it.
- Off: codes on the invoice are ignored, and coding comes from the vendor's setup.
On a PO invoice, codes on the document aren't used, and a note lists them.
Change it when your vendors print numbers that look like your account codes but aren't, such as their own product or job codes.
Code from the Vendor's Last Approved Invoice
- On (the default): when there are no codes on the invoice and the vendor has no default accounts (or a single recurring purchase line), MagiCapture copies the account lines from the vendor's last approved invoice, with the note "The last approved invoice for this vendor used these GLs". It doesn't do this for the Unknown Vendor.
- Off: those invoices come in without accounts, for someone to code.
You can also set this per vendor with Use last approved invoice to find lines on the vendor's page.
Change it when a vendor's invoices are coded differently each time, so copying the last one would mostly be wrong. Giving the vendor default accounts is often the better fix.
Sales Tax Account
- Blank (the default): sales tax stays in the invoice's coded amounts.
- An account: sales tax MagiCapture reads goes on its own line to this account, with the invoice's location filled into the account. Type the account in Capture Sales Tax as a GL Line (GL Code) and click Save.
With Invoice Charges (Freight, Misc, Trade Discount) turned on in Preferences, the vendor's default tax account comes first, and this account is used only for vendors without one.
Change it when you track sales tax in its own account.
Sales Tax Distribution Reference
Shown only to Dynamics GP companies that don't use Invoice Charges.
- Blank (the default): sales tax is captured as set in Sales Tax Account.
- Text, up to 30 characters: sales tax stays on the account of the line it came from, on its own line labeled with this text, which GP receives as the distribution reference. Sales Tax Account is then not used.
Change it when you want tax charged to the same account as the purchase but still told apart in GP, for example with SALESTAX. The Sales Tax by Location report counts lines with this reference as sales tax.
Freight Account
- Blank (the default): freight stays where MagiCapture finds it, in the invoice's lines and coding.
- An account: freight MagiCapture reads goes on its own line to this account, with the invoice's location filled in, and is left out of the captured line items. Type it in Capture Freight as a GL Line (GL Code) and click Save.
With Invoice Charges on, the vendor's default freight account comes first, and this account is used only for vendors without one. See Enter freight, misc and trade discount as invoice charges.
This setting isn't shown when Split the GP Import by Purchase Order is on and Invoice Charges is off, because that import sends freight with the invoice lines. Turn on Invoice Charges to give freight its own account there.
Change it when you post freight to its own account.
Locations
This section appears for every company, but its settings only work with Use GL Locations/Markets turned on, under Settings → Company → Preferences. How MagiCapture assigns an invoice's location explains them in full, with examples.
| Setting | What it does | Default |
|---|---|---|
| MagiCapture Assigns the Location | Sets each invoice's location from the address it was emailed to, or from the invoice. The other settings here need it on. | On |
| Prefer the Location Found on the Document | Looks on the invoice first, and uses the location code in the email address only if it finds nothing. | Off |
| Location Exceptions | Locations whose emailed invoices follow the opposite order. | None |
| Default Fallback Location | The location used when none is found any other way. | None |
| Vendors Are Set Up per Location | Matches only vendors at the invoice's location, and uses their default accounts as they are. | Off |
Settings a vendor can override
Four settings can be set differently for one vendor. Open the vendor from Vendors, edit it, and use the switches under Vendor Settings. Each switch's tooltip shows the company setting.
| On the vendor's page | Overrides |
|---|---|
| Reject Statements | Reject Statements |
| Capture Email Body | Capture Invoices Stated in the Email Body |
| Use last approved invoice to find lines | Code from the Vendor's Last Approved Invoice |
| Enable PDF Splitting | Whether MagiCapture splits a PDF holding several invoices into separate invoices. Fidesic support sets this for your company. |
Fidesic support also manages a few options that aren't on your page, such as AI account suggestions and AI review notes on captured invoices. Contact support if you'd like them changed.
Where rejected files go
Files MagiCapture rejects go to Rejected Docs, in the side menu under the Invoice Inbox. The Rejected Notes column says why:
| Rejected Notes | Rejected because |
|---|---|
| Reject Unknown Vendor | The vendor wasn't matched, and Reject Invoices from Unknown Vendors is on. |
| Reject All Statements | It's a statement, and Reject Statements is on for the company or the vendor. |
| Only PDF and image files are accepted | It's a Word, Excel or CSV file, and Reject Files That Aren't PDFs or Images is on. |
| Email Body Capture Disabled | It was read from an email body, and email-body capture is off for the vendor or the company. |
| Unsupported content type | MagiCapture can't read that kind of file. |
If the person who emailed or uploaded the file is a user in your company, they get a notification and an email saying it was rejected.
Click a rejected file to open it and enter the invoice yourself, or tick files and click Delete Selected. To share the work, assign rejected files to users: see Fidesic Rejected Queue- Assign to Users.