Overview
If this is your first time installing vendor sync, start at the beginning of this guide.
If you are just looking to add an ADDITIONAL company to an existing setup, skip to the Configuration section.
Preparation
- User Log out and GP shutdown NOT required for this module.
- The Fidesic Account Owner is required to view and acquire API Keys to Connect.
- Fidesic Vendor Sync Module can be installed on any machine with GP Database Access. The module will run as a service on this machine and sync any changes made to the vendor lists, or chart of accounts within GP Automatically.
- Implementation must be done as a WINDOWS ADMINISTRATOR during all steps. Whenever possible to “run application as administrator”, please do so to avoid any issues.
- Instructions are as if the module is installed on the SQL server host. Installation can be done on a different machine with network access, just make sure use the correct machine name or IP of the machine hosting the SQL database
- Download Fidesic Sync Module here.
Installation
- Uninstall all previous version using standard windows Control Panel “Programs and Features”
- Open “Fidesic Vendor Sync Service.exe” using the windows “Run as Administrator” option.
- Follow prompts for standard installation.
- Service should Auto-Open upon completion.
- Default install location for manual open: C:\Program Files (x86)\Fidesic\Fidesic Service Monitor.exe
Configuration
- Fidesic Vendor Sync runs in the task bar as a Green Dot. Double clicking will open configuration window.
- Select Setup:Configure

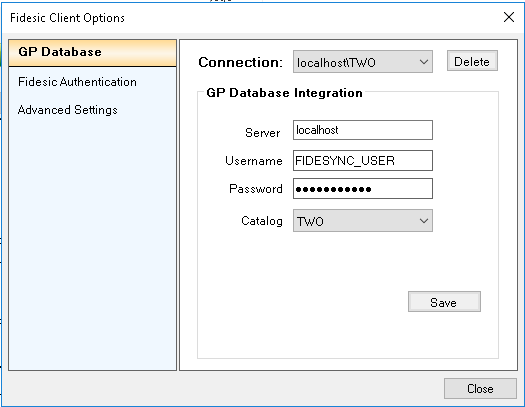
GP Database Setup
- Connection: Create New (this will be the same to create a new connection to an existing setup)
- Server: if installed on SQL server host machine, use “localhost”. If not, use local IP address or Name of the machine hosting SQL Server
- Username: your ‘sa’ user name
- Password: ‘sa’ password
- Catalog: Select your “GP Company Database”
Fidesic Authentication
In this window, the "Username" is the API key, and the "Password" is the API password. Click here to learn how to get this information from Fidesic. The Account Owner is the only user with access to these keys within Fidesic. The account owner will be Tagged as such in the manage users list in Fidesic.

If you provide the proper login info and receive a "cannot authenticate" message, make sure that the machine you're on is able to ping api.fidesic.com and that our software has writes to log files to the server.
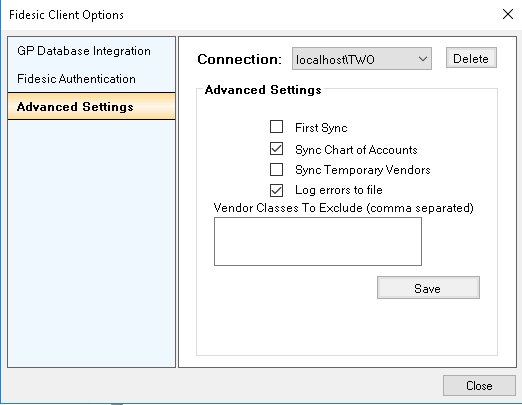
Advanced Settings- First Sync: Will be auto-selected after install, and auto-deselected after initial sync. This check all vendor records instead of “new” vendor records
- Sync Chart of Accounts: When selected the sync service will also upload GL lists, and vendor based GL defaults
- Sync Temporary Vendors: When selected this option sync temporary vendors. Default is not to sync temporary vendors
- Vendor Classes to Exclude: Enter any vendor classes you would like to exclude from the sync process.
- Log Errors to File: This will create a log file in the c:\ folder on the local machine. This file will contain all connection attempts, and any errors encountered. Do not enable permanently, it is intended for debugging purposes only. This setting will create one log file per day, which will gradually take up space on your local harddrive.
Setting up Non SA SQL user for connecting our vendor sync to your company Database(Optional)
As an alternative to using the 'sa' login, you can create a SQL role specific to our Vendor sync modules requirements.
- Run the attached script to Create our tables, create a security role, and set permissions for that user.
- FIDESYNC_TABLE_AND_ROLE.sql (Note: This needs to be run against the DYNAMICS database and each COMPANY database using sync service)
- Create Login in Sql Management Studio-
- Set User Name, Password, and Set the Default Database.
- User Mapping Settings will need the "FIDESYNC_ROLE" role that was creating using the previous script.
- Make sure to select DYNAMICS and any company databases that will need access to this service.
- Select the "FIDESYNC_ROLE" as the database role membership.
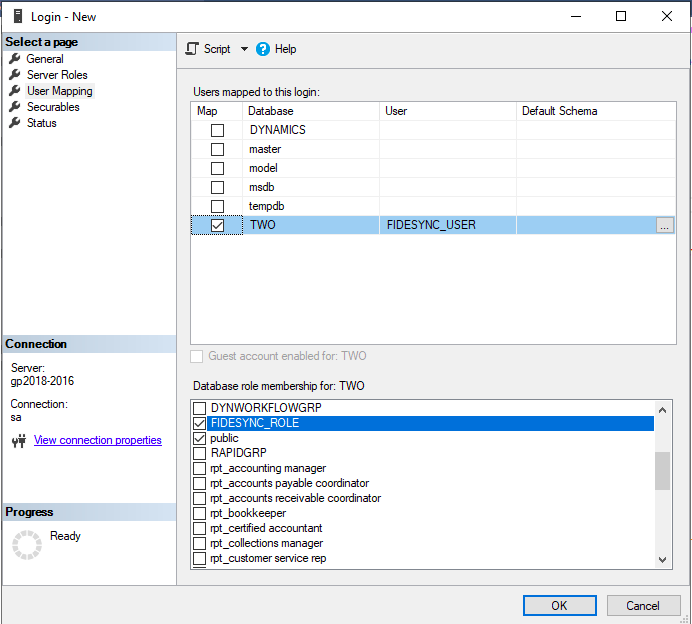
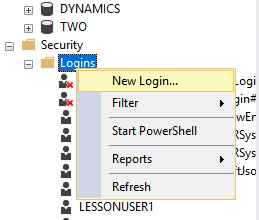

Table References:
- 'Select' Access to the following tables (select access preferred to all GP company tables for future compatibility):
- "PM00200"
- "PM00300"
- "SY01200"
- "GL00100"
- "GL00105"
- "PM00203"
- "SY03300"
- 'Select', 'Insert', 'Update', 'Delete', 'Alter' Access to the following table:
- "FIDESYNC" - To Be Created on First Connect or manually.
- 'Select' Access to the DB_Upgrade and SY01500 tables on the DYNAMICS database
FIDESYNC_TABLE_AND_ROLE.sql Code Block
/*
*    FIDESYNC Manual Installation script.
*
*    This script will create the necessary table (FIDESYNC) for our sync service to run.
*    It will create a new database ROLE that can be used specifically for our service.
*    It will grant SELECT permissions to this role for all GP Company tables and views.
*    It will grant SELECT, INSERT, DELETE, AND ALTER permissions to this role for the FIDESYNC table
*
*    Instructions:   Run this script against each COMPANY database and the DYNAMICS database.
*                    Add a database Login that the service will use.
*                    Add the Login as a user on each company database that you want sync to run on
*                    Assign the FIDESYNC_ROLE to the Login
*
*/
/****** CREATE FIDESYNC ROLE ******/
IF DATABASE_PRINCIPAL_ID('FIDESYNC_ROLE') IS NULL
BEGIN
    CREATE ROLE [FIDESYNC_ROLE]
    PRINT 'Created FIDESYNC_ROLE Role'
END


/****** GRANT FIDESYNC ROLE PERMISSION TO VIEW DYNAMICS Version and CompanyInfo tables ******/
IF DB_NAME() = 'DYNAMICS'
BEGIN
 GRANT SELECT ON DB_Upgrade TO FIDESYNC_ROLE
 GRANT SELECT ON SY01500 TO FIDESYNC_ROLE
 PRINT 'Added SELECT permission to the FIDESYNC_ROLE role for DYNAMICS Version and CompanyInfo tables'
 PRINT 'Add the Login as a user on DYNAMICS database'
 PRINT 'Assign the FIDESYNC_ROLE to the Login'
 RETURN
END
ELSE
BEGIN
 /****** CREATE FIDESYNC SYNC TABLE ******/
 IF OBJECT_ID(N'dbo.FIDESYNC', N'U') IS NULL
 BEGIN
 CREATE TABLE FIDESYNC(
 ID INT IDENTITY PRIMARY KEY,
 TableName NVARCHAR(50) NOT NULL,
 TableKey NVARCHAR(50) NOT NULL,
 LAST_SYNC DATETIME NOT NULL,
 FAILED_ATTEMPT DATETIME,
 FAILED_COUNT INT NOT NULL DEFAULT 0)
 PRINT 'Added FIDESYNC table'
 END
 ELSE
 PRINT 'FIDESYNC table already exists'

 /****** ADD MISSING FIDESYNC COLUMNS ******/
 IF NOT EXISTS (SELECT * FROM sys.columns WHERE  object_id = OBJECT_ID(N'[dbo].[FIDESYNC]') AND name = 'FAILED_ATTEMPT')
 ALTER TABLE dbo.FIDESYNC ADD FAILED_ATTEMPT DATETIME
 IF NOT EXISTS(SELECT * FROM sys.columns WHERE  object_id = OBJECT_ID(N'[dbo].[FIDESYNC]') AND name = 'FAILED_COUNT')
 ALTER TABLE dbo.FIDESYNC ADD FAILED_COUNT INT NOT NULL DEFAULT 0


 /****** GRANT FIDESYNC ROLE PERMISSION TO VIEW GP COMPANY TABLES AND VIEWS ******/
 declare @cStatement varchar(255)
 declare G_cursor CURSOR for select 'grant select on [' + convert(varchar(128),name) + '] to FIDESYNC_ROLE' from sysobjects
 where (type = 'U' or type = 'V') and uid = 1
 set nocount on
 OPEN G_cursor
 FETCH NEXT FROM G_cursor INTO @cStatement
 WHILE (@@FETCH_STATUS <> -1)
 begin
 EXEC (@cStatement)
 FETCH NEXT FROM G_cursor INTO @cStatement
 end
 DEALLOCATE G_cursor
 PRINT 'Added SELECT permission to the FIDESYNC_ROLE role for all Company Tables and Views'

 /****** GRANT FIDESYNC ROLE PERMISSION TO VIEW AND ALTER ON FIDESYNC TABLE ******/
 grant select, insert, update, delete, alter on [FIDESYNC] to FIDESYNC_ROLE
 PRINT 'Added SELECT, INSERT, DELETE, ALTER permission to the FIDESYNC_ROLE role for the FIDESYNC table'
 PRINT ''
 PRINT ''
 PRINT 'Add a database Login that the service will use.'
 PRINT 'Add the Login as a user on each company database that you want sync to run on'
 PRINT 'Assign the FIDESYNC_ROLE to the Login'


END