Overview
This guide is for companies that already have Fidesic Vendor Sync installed and are looking to update to the latest version. This new version has greater reliability, reporting and new features to make the sync the best version yet.
Steps:
- Uninstall the Old Version
- Install the new version as SA
- Validate Configuration Settings
- ONLY REQUIRED IF YOU HAVE A Custom SQL Login Setups, modify the SQL Role to access new tables.
Uninstalling the Old Version
To run this update you will need to uninstall the old version of vendor sync, which will require locating the machine in your server environment where vendor sync is currently installed. This module is typically installed on either the SQL server itself, or the application server. The file you are looking for is located in this directory of the local machine: C:\Program Files (x86)\Fidesic\Fidesic Service Monitor.exe.
Once you've located the proper machine you can use the standard windows Add and Remove Programs function to uninstall the Fidesic Vendor Sync.

Note: Make sure to uninstall the Vendor Sync Module and NOT The Fidesic for GP Module.
Installing this old version will not remove your configuration files, making setup after the new installation a bit easier.
Preparation for the New Module
- User Log out and GP shutdown NOT required for this module.
- You should install the vendor sync module in the same location as the previous version to minimize setup.
- Implementation must be done as a WINDOWS ADMINISTRATOR during all steps. Whenever possible to “run application as administrator”, please do so to avoid any issues.
- Download The Latest Fidesic Sync Module here.
Installation
- Open “Fidesic Vendor Sync Service.exe” you downloaded using the windows “Run as Administrator” option.
- Follow prompts for standard installation.
- Service should Auto-Open upon completion.
- Default install location for manual open: C:\Program Files\Fidesic\Fidesic Service Monitor.exe if you need to manually open it.
Verify Configuration
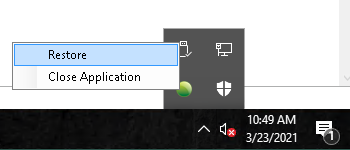
- Fidesic Vendor Sync runs in the task bar as a Green Dot. Double clicking will open configuration window.
- Select Setup:Configure
- Validate that you Vendor Sync Settings did come over from the previous version by validating a valid GP database connection and Fidesic Authentication connection.
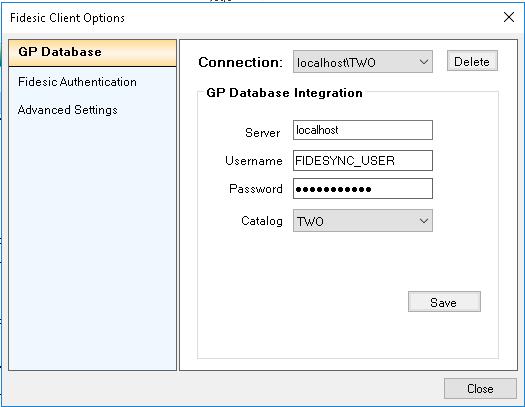
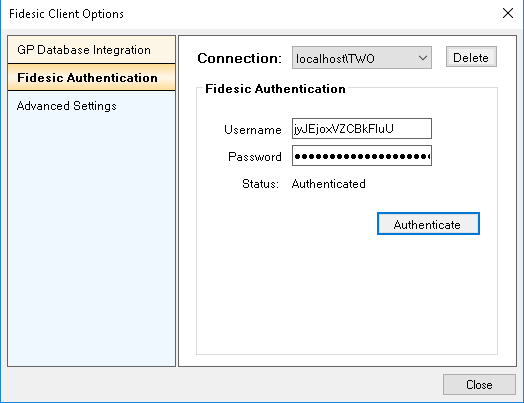
If all settings have come across (which is the expected behavior), you're all set. Just make sure the service has been started.
ONLY REQUIRED FOR CUSTOM SQL ROLE SETUPS: modifying the SQL Role to access new tables.
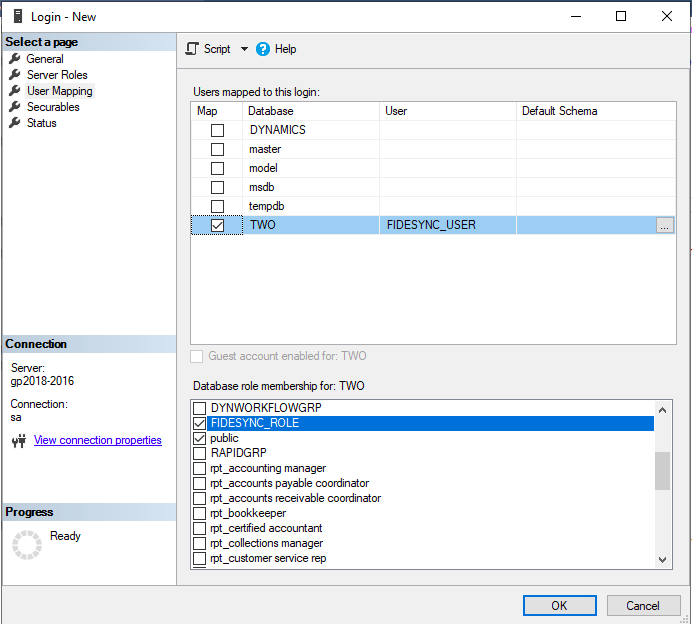
User Mapping Settings will need the "FIDESYNC_ROLE" role that was creating using the previous script.
- Make sure to select DYNAMICS and any company databases that will need access to this service.
- Select the "FIDESYNC_ROLE" as the database role membership.
Run the following script against the DYNAMICS database and any added company databases.
FIDESYNC_TABLE_AND_ROLE.sql Code Block
/*
*    FIDESYNC Manual Installation script.
*
*    This script will create the necessary table (FIDESYNC) for our sync service to run.
*    It will create a new database ROLE that can be used specifically for our service.
*    It will grant SELECT permissions to this role for all GP Company tables and views.
*    It will grant SELECT, INSERT, DELETE, AND ALTER permissions to this role for the FIDESYNC table
*
*    Instructions:    Run this script against each COMPANY database.
*                    Add a database Login that the service will use.
*                    Add the Login as a user on each company database that you want sync to run on
*                    Assign the FIDESYNC_ROLE to the Login
*
*/
/****** CREATE FIDESYNC SYNC TABLE ******/
IF OBJECT_ID(N'dbo.FIDESYNC', N'U') IS NULL
BEGIN
    CREATE TABLE FIDESYNC(
    ID INT IDENTITY PRIMARY KEY,
    TableName NVARCHAR(50) NOT NULL,
    TableKey NVARCHAR(50) NOT NULL,
    LAST_SYNC DATETIME NOT NULL,
    FAILED_ATTEMPT DATETIME,
    FAILED_COUNT INT NOT NULL DEFAULT 0)
    PRINT 'Added FIDESYNC table'
END
ELSE
    PRINT 'FIDESYNC table already exists'
GO
/****** ADD MISSING FIDESYNC COLUMNS ******/
IF NOT EXISTS (SELECT * FROM sys.columns WHERE  object_id = OBJECT_ID(N'[dbo].[FIDESYNC]') AND name = 'FAILED_ATTEMPT')
    ALTER TABLE dbo.FIDESYNC ADD FAILED_ATTEMPT DATETIME
IF NOT EXISTS(SELECT * FROM sys.columns WHERE  object_id = OBJECT_ID(N'[dbo].[FIDESYNC]') AND name = 'FAILED_COUNT')
    ALTER TABLE dbo.FIDESYNC ADD FAILED_COUNT INT NOT NULL DEFAULT 0
GO
/****** CREATE FIDESYNC ROLE ******/
IF DATABASE_PRINCIPAL_ID('FIDESYNC_ROLE') IS NULL
BEGIN
    CREATE ROLE [FIDESYNC_ROLE]
    PRINT 'Created FIDESYNC_ROLE Role'
END
GO
/****** GRANT FIDESYNC ROLE PERMISSION TO VIEW GP COMPANY TABLES AND VIEWS ******/
declare @cStatement varchar(255)
declare G_cursor CURSOR for select 'grant select on [' + convert(varchar(128),name) + '] to FIDESYNC_ROLE' from sysobjects
    where (type = 'U' or type = 'V') and uid = 1
set nocount on
OPEN G_cursor
FETCH NEXT FROM G_cursor INTO @cStatement
WHILE (@@FETCH_STATUS <> -1)
begin
    EXEC (@cStatement)
    FETCH NEXT FROM G_cursor INTO @cStatement
end
DEALLOCATE G_cursor
PRINT 'Added SELECT permission to the FIDESYNC_ROLE role for all Company Tables and Views'
GO
/****** GRANT FIDESYNC ROLE PERMISSION TO VIEW GP COMPANY TABLES ******/
grant select, insert, update, delete, alter on [FIDESYNC] to FIDESYNC_ROLE
PRINT 'Added SELECT, INSERT, DELETE, ALTER permission to the FIDESYNC_ROLE role for the FIDESYNC table'
PRINT ''
PRINT ''
PRINT 'Add a database Login that the service will use.'
PRINT 'Add the Login as a user on each company database that you want sync to run on'
PRINT 'Assign the FIDESYNC_ROLE to the Login'