Preparation
- You will need local admin access on the machine where you plan to install the Fidesic QuickBooks Desktop Module.
- The Module must be installed in the location where QuickBooks is installed.
- If you are upgrading, you will need to uninstall all previous module versions. This can be done through the standard Windows Control Panel → Programs → Uninstall a Program function.
Implementation must be done as a Windows Administrator during all steps. Whenever possible, right-click and choose "Run as administrator" to avoid any issues.
Module Install
Download the installer using the link below:
https://api.fidesic.com/downloads/FidesicDesktop_Setup.exe
Running Installer
Important: Run as Windows Administrator
-
Download the installer from the link above.
-
Right-click the downloaded file and select Run as administrator.
-
Follow the on-screen prompts.
-
Click Finish when the installer completes.
A "Fidesic QBD Desktop" shortcut will be placed on the desktop of the installation computer.
Completing Setup in QuickBooks
- Open QuickBooks and login in single user mode.
- A security prompt will pop up for the company you log in as.
- Select Yes, Always option and then click OK
- From there you should be able to login and begin normal processing.
Payment Attachments
If you sync Payment Attachments (typically only if you don't use invoices in Fidesic), you may be attaching the pdfs to invoices in QBD.
Open Fidesic for QB and make sure "Sync Payments only" has a checkmark. If it does not, add the checkmark and restart Fidesic for QB.

To find the location of where these files are, you can open up the company in Quickbooks and click F2 on your keyboard. This will open a window similar to the following.
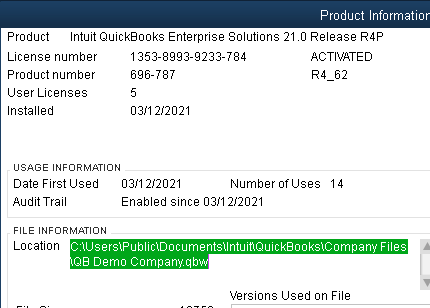
The highlighted location is where your Quickbooks company file is located. In this directory, there will be another folder called "Attach". Our application will need to be able to access this folder to send the files to Fidesic. Make sure the user running QB and Fidesic for QB has permissions to this folder.
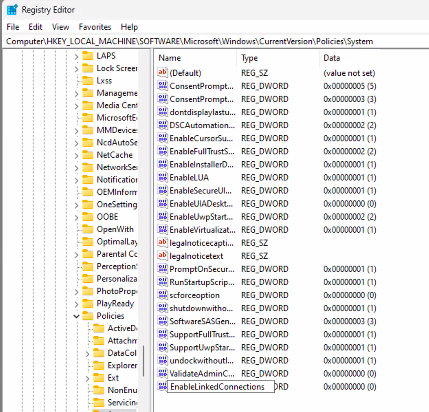
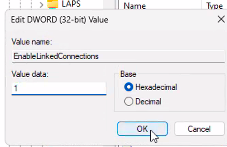
It may be necessary to map a network drive on the machine. If Quickbooks can not find the mapped drive, you may need to edit/add a registry key. Navigate to HKLM\Software\Microsoft\Windows\CurrentVersion\Policies\System
Add (or edit) a DWORD key called EnableLinkedConnections and then set the value to 1. (see screenshots below).
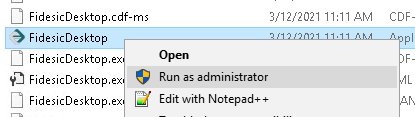
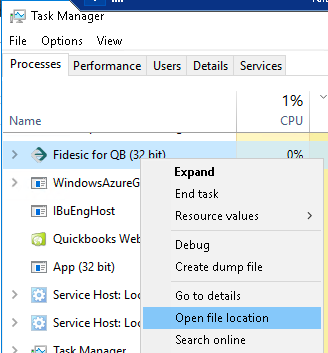
If for some reason the application can't access this location, you may need to Run as Administrator. To do this, you'll need to find the actual installed location by opening the application. Then open Task Manager and find "Fidesic for QB". Right click on "Fidesic for QB" and go to "Open file location".
From here, right click on FidesicDesktop and left click on Run as administrator.