Overview
This will take you through the standard steps for account configuration and setup of Fidesic AP for Dynamics GP. If you'd prefer, this guide is also available in video format below.
Creating Your Account
Head to the New Account Page: https://app.fidesic.com/#/auth/Register
Required Fields:
- Official Company Name (Will be used for payment processing)
- First and Last name
- Email Address (Your Business Email Address)
- Accounting Package: Dynamics GP
After you've clicked "Register" you'll receive a confirmation email. This will allow you to set up a password for your account and login for the first time. Simply click the link in the confirmation email to be taken to the password setup page.
After you've created your account, you'll be logged in automatically.
Company Profile Setup and Configuration
Head to settings at the top right, and select Company Settings.
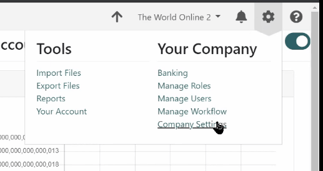
From here you'll be on the Company Profile tab.
Click on the Edit button:
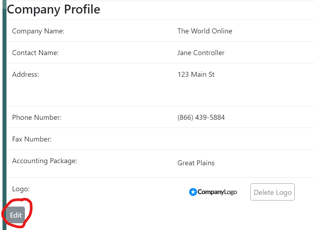
Please provide the following info (These fields are required for payment processing, and will be used as your return address on any printed checks):
- Address 1
- City
- State
- ZIP
- Confirm Accounting Package
- Phone Number
You can also upload a custom logo using the Choose File prompt:

Company Preferences
The following are a list of preferences and what they control within Fidesic. If you have any questions about the exact details of a preferences it's best to leave it in the default state, and contact support for more info.
- Use GL Locations/Markets
- This preference adds several location-based functions within the system. If you have a segment of your GL assigned to specific locations or markets, you likely will want to enable this preference.
- Things enabled by this preference:
- Location based user controls for invoice visibility
- Location based invoice routing
- Location based invoice capture on OCR
- Locations Tab under company settings for uploading Locations Lists and Addresses.
- Location Based sorting in the Invoices Received page.
- Have Fidesic Print and Mail Approved Checks
- This preference will opt you in for Fidesic to Print and Mail your paper checks. Enabling this will mean you can no longer download and print checks locally from Fidesic. We will begin processing the next available batch at a rate outlined in your agreement.
For a detailed overview of all AP Company Permissions, View the page detail in the help desk
Add Users and Roles Roles
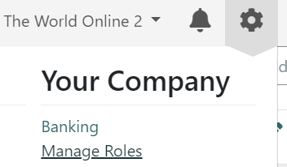
To get to the roles page, navigate to Settings and click Manage Roles.
From the Manage Roles screen you have the ability to create groups for different levels of users within your organization. These roles can then be assigned to individual users. We've pre-loaded Fidesic with common base roles.

Clicking the plus sign to the right of the role name will expand the group and show you the details.

The options on the right side will allow you to create a new role copying an existing, edit an existing role, or delete a role. For more information on individual permission, view the Permission Full Detail Page.
Manage Users
To add or manage users, head to Manage Users in the left navigation panel.

To add a new user, select Add User at the bottom left. We need a valid email address and assigned role to create a new user.
To manage users, click the user to open a detailed view of their setup. You can add/remove roles, add/remove assigned locations, view pending invoice approvals, or resend the signup email.

Invoice Processing Setup (Including OCR/Data Capture)
You have multiple options for invoice submission setup. The most common way is to use email dropboxes.
Email Dropbox Setup
From the Company Settings page, click the Invoice Inbox Settings tab. This page will allow you set your custom Fidesic Dropbox address. Most companies use their company name as the prefix on the AP dropbox email setup. Enter your email dropbox prefix and click save. Please note: you can only have one prefix per account, and it can not be changed once set.
Once set, you will have two email addresses for submission of invoices, formatted as:
- {prefix}@ap.fidesic.com
- {prefix}@ocr.fidesic.com
Using the @ap.fidesic.com address
Invoices sent to this address will queue up on the Invoice Inbox page in either the My Queue or Company Queue tab. Invoices submitted by your user name address will show up in My Queue and all else will appear in the Company Queue
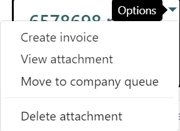
To Process invoices in this queue, simply click the PDF name, or click the arrow for more options.
Using the @ocr.fidesic.com address
Invoices sent to this inbox will be automatically captured by our system and will not require manual entry. Please note, invoices sent to this queue may take up to 1 business day before they appear in your approval queue.
Additionally you can use locations codes on this prefix to automatically add location coding to invoices sent to OCR.
To enable this, you will need location company preference enabled. Once enabled, Invoices sent to these addresses will be coded to their corresponding locations by OCR. Invoices sent to the general OCR address will be coded based on the "ship to address" on invoices.
To submit to location based dropboxes use the following format: two+location code@ocr.fidesic.com
Add Banking Info
Before processing any payments (paper check or ACH) using Fidesic, you will need to enter bank account information. For this to function properly, this info must have a matching configuration on the Checkbook ID within Dynamics GP (under Financial > Checkbook).
To add banking info, head to the Settings menu at the top right, then select Banking.
To add a bank account, you will need to enter all fields and then click Save. Note, the routing and account numbers much match as it is set on the Checkbook ID within Dynamics GP (under Financial > Checkbook).

Configure GL/Chart of Accounts
If you haven't already done so, it would be best to install the Fidesic Vendor Sync Module prior to configuring your GL accounts in Fidesic. Setting up these account names will enable individual GL segment based rules and stages within the workflow engine.
To get to the GL Setup, Navigate to Company Settings -> Chart of Accounts tab.

To edit the segment names, click on a segment and the list will then become editable.
Make sure to pick your number of segments and give each segment a name matching to how you have things set up in GP.

Add Locations
Location configuration will enable all Location based features within Fidesic, including user based location assignment, location based capture with OCR, and location based approval routing an visibility.
To get to the Locations Setup, Navigate to Company Settings -> Locations tab.
Note: if you do not see the locations tab, you need to enable Use GL Locations/Markets under the Company Preferences tab.
Once enabled, you'll be able to use this page to add specific locations and tie them with your chart of accounts. You can add locations using the Add Location button, but to add multiple, or Location Addresses, you should click the link on the page that mentions a list of locations.
Set up a Workflow
Our workflow is completely customizable in stages, rules, and number of approvers. For a brief overview of the workflow setup, please view the following video: https://youtu.be/UJxKrYriXCw?t=748
For more info or help on configuration, please contact support or your Fidesic onboarding Rep.
Direct ACH Setup
For info on setting up Direct ACH with Fidesic and your bank, please review our Direct ACH Setup Guide.
Fidesic for GP Module Installation
The Fidesic AP Module for GP will connect your GP system to Fidesic for all functions. Individual Instructions below.
Standard Fidesic Module Installation Instructions Fidesic Vendor Sync for Dynamics GP Installation Instructions