![fidesic-logo-300px-2023-2.png]](https://help.fidesic.com/hs-fs/hubfs/fidesic-logo-300px-2023-2.png?height=40&name=fidesic-logo-300px-2023-2.png)
Fidesic AP connects directly to your QuickBooks Online company. Once it's connected, Fidesic brings in your vendors, accounts, classes, locations, terms and items from QuickBooks, sends your approved invoices to QuickBooks as bills, and keeps payments in step both ways. There's nothing to install: you sign in to QuickBooks from Fidesic, and the sync runs on its own from then on.
This article covers connecting and choosing your settings. For exactly what moves between Fidesic and QuickBooks and when, see How Fidesic syncs with QuickBooks Online.
Before you start
- Your Fidesic company is set to QuickBooks Online. Go to Settings → Company → Company Profile, click Edit, and set Accounting Package to QuickBooks Online. The QuickBooks Online settings page only appears once this is set.
- You can manage the company profile. Connecting and changing these settings needs the Manage Company Profile permission.
- You can sign in to QuickBooks Online as an admin of the company you're connecting. QuickBooks only lets an admin connect an app.
- Your payment accounts are in Fidesic. Fidesic pays from the bank accounts under gear menu → Administration → Banking. You'll match each one to its QuickBooks bank account below. See Adding ACH Info to your Bank Accounts in Fidesic.
Connect to QuickBooks
- Go to Settings → Integrations → QuickBooks Online.
- Click Connect to QuickBooks.
- Sign in to QuickBooks, choose the company to connect if you have more than one, and click Connect.
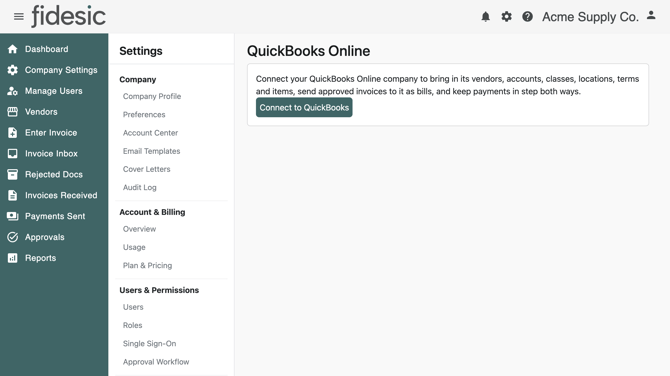
QuickBooks sends you back to Fidesic, which shows QuickBooks is connected. The first sync starts within a minute.
The first sync reads everything from QuickBooks, so on a large company it can take a few minutes. After that, Fidesic syncs every 15 minutes and only reads what has changed.
A QuickBooks company can be connected to only one Fidesic company at a time.
Your existing vendors
On the first sync, Fidesic matches QuickBooks vendors to the vendors you already have in Fidesic by name, so you don't end up with duplicates. QuickBooks vendors that Fidesic doesn't have are added. Vendors you already had in Fidesic that QuickBooks doesn't have are left alone. They aren't copied into QuickBooks. Vendors you add in Fidesic after connecting are created in QuickBooks on the next sync.
Choose your settings
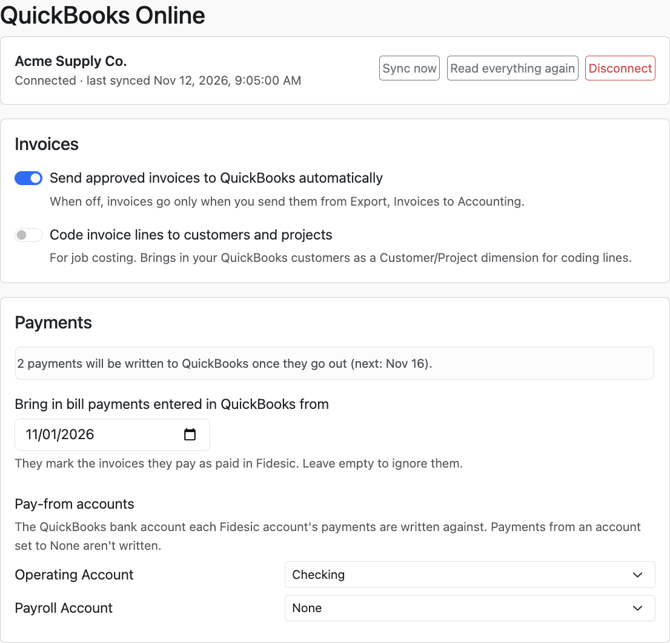
Once you're connected, the page shows your settings. Each one saves as soon as you change it, and the sync runs with it within a minute. There's no Save button.
Invoices
- Send approved invoices to QuickBooks automatically: on by default. Each sync sends every invoice that has finished approval to QuickBooks as a bill, and credit memos as vendor credits. Turn it off if you'd rather choose when invoices go. They then go only when you send them from gear menu → File operations → Export Files → Invoices to Accounting (see below).
- Code invoice lines to customers and projects: off by default. Turn it on if you job-cost bills to customers or projects in QuickBooks. Fidesic brings in your QuickBooks customers and projects as a Customer/Project dimension, so you can code each invoice line to one.
Payments
- Bring in bill payments entered in QuickBooks from: leave this empty if you pay all your bills through Fidesic. If you sometimes pay a bill in QuickBooks instead, enter a date. Bill payments entered in QuickBooks on or after that date mark the invoices they pay as paid in Fidesic, so nobody pays them twice.
- Pay-from accounts: for each Fidesic payment account, pick the QuickBooks bank account its payments come out of. Fidesic records each payment against that account in QuickBooks. Payments from an account left on None aren't written to QuickBooks.
When payments are scheduled but haven't gone out yet, the Payments section says how many are waiting and when the next one goes. They're written to QuickBooks once they've been paid, mailed or printed.
Attachments
To attach each invoice's files to its bill in QuickBooks, turn on Sync Invoice Attachments to Accounting Package under Settings → Company → Preferences.
Sending invoices yourself
Whether or not invoices go automatically, you can send approved invoices right away:
- Go to gear menu → File operations → Export Files and open the Invoices to Accounting tab.
- Select the invoices to send.
- Click Send Selected to QuickBooks.
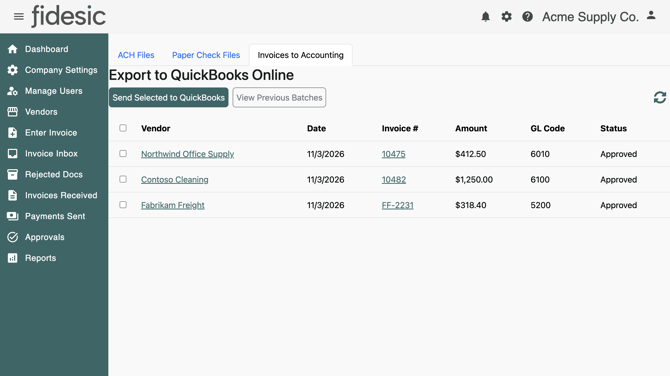
Invoices that reach QuickBooks drop off the list. Any that couldn't be sent stay on the list, with the reason above it. See Troubleshooting QuickBooks Online sync errors.
QuickBooks Online companies don't download an export file. Invoices go straight to QuickBooks.
Sync now, Read everything again, and Disconnect
- Sync now runs the sync within a minute instead of waiting for the next 15-minute pass. Use it after changing something in QuickBooks that you need in Fidesic right away.
- Read everything again reads every vendor, account and list from QuickBooks on the next sync, instead of only what changed. Use it if something in Fidesic looks out of step with QuickBooks.
- Disconnect stops the sync. Nothing already synced is removed from Fidesic or QuickBooks, and connecting the same company again carries on where it left off.
Paying vendors
With QuickBooks connected, you pay invoices in Fidesic as usual. To have Fidesic send ACH payments straight to your vendors, see Setting Up Direct ACH.