Quick Start Overview
This guide is designed to walk you through all the necessary configuration steps to get up and running with Fidesic AP. Aside from the steps outlined here, you will also need to configure your integration with your accounting system.
For any other questions, please contact our support or implementation staff for assistance with these setup steps.
Base Account Setup
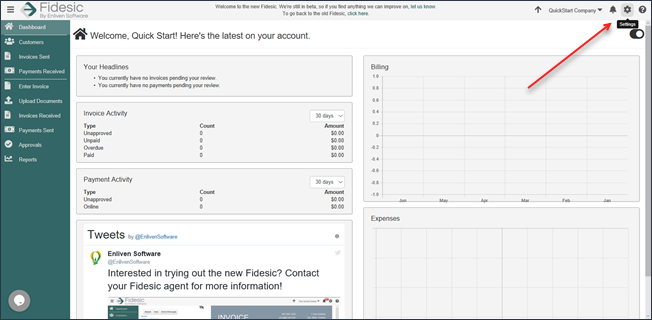
To set up your base-level account, begin by clicking the “Settings” icon, as shown in the following illustration.
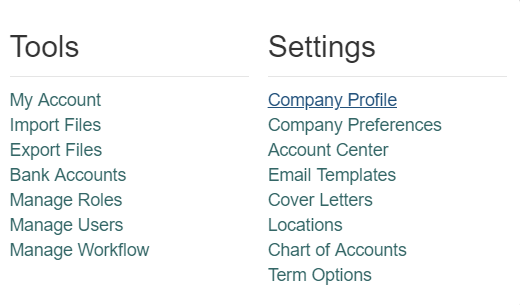
Next, select the “Company Profile” option on the “Settings” menu, as shown in the following illustration.
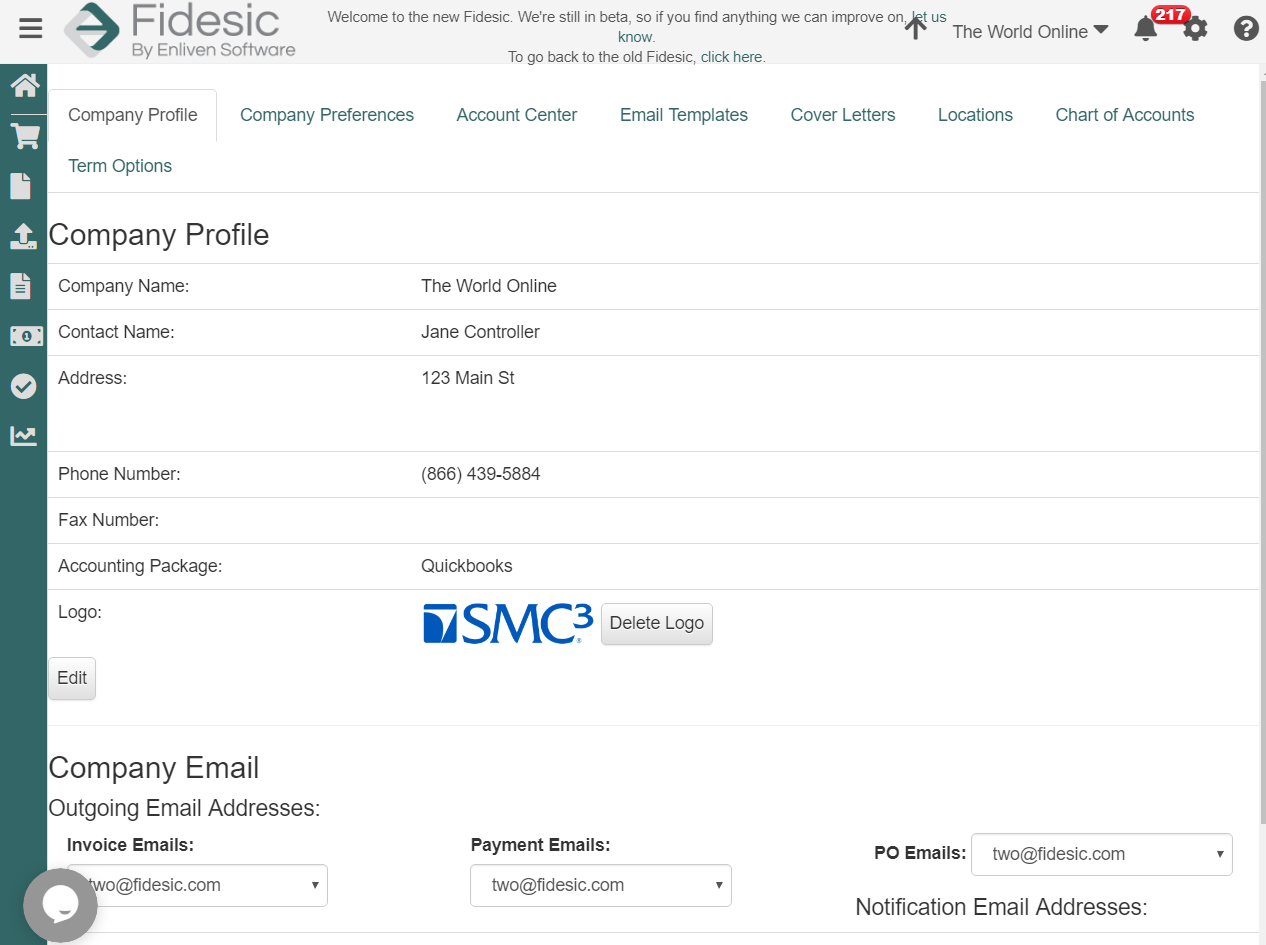
The “Company Profile” screen, shown below, is displayed. You’ll need to add your “Company Name,” along with an “Address,” “Phone Number” and a “Logo,” if desired. Additionally, you can set your “Outgoing Email Address, as well as “Invoice Emails,” “Payment Emails” and “PO Emails.” Additionally, you can add “Notification Email Addresses” if you want to use a different “Email Address” to send out your “Notifications.”
Company Preferences
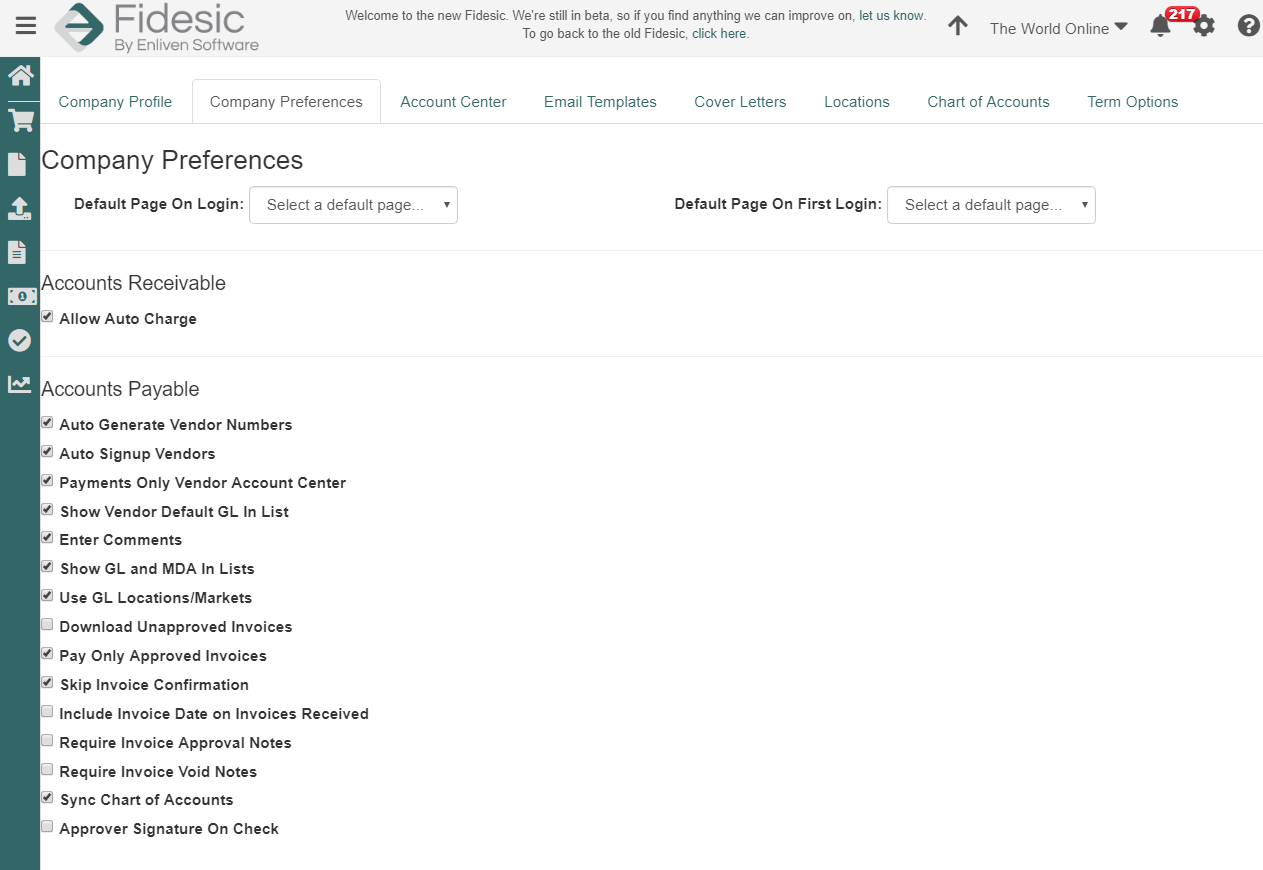
Selecting the “Company Preferences” tab displays the “Company Preferences screen, shown below, which controls how the site is actually set up. Most of these options are set up by default, so there probably won’t be much that you’ll need to enable/disable.
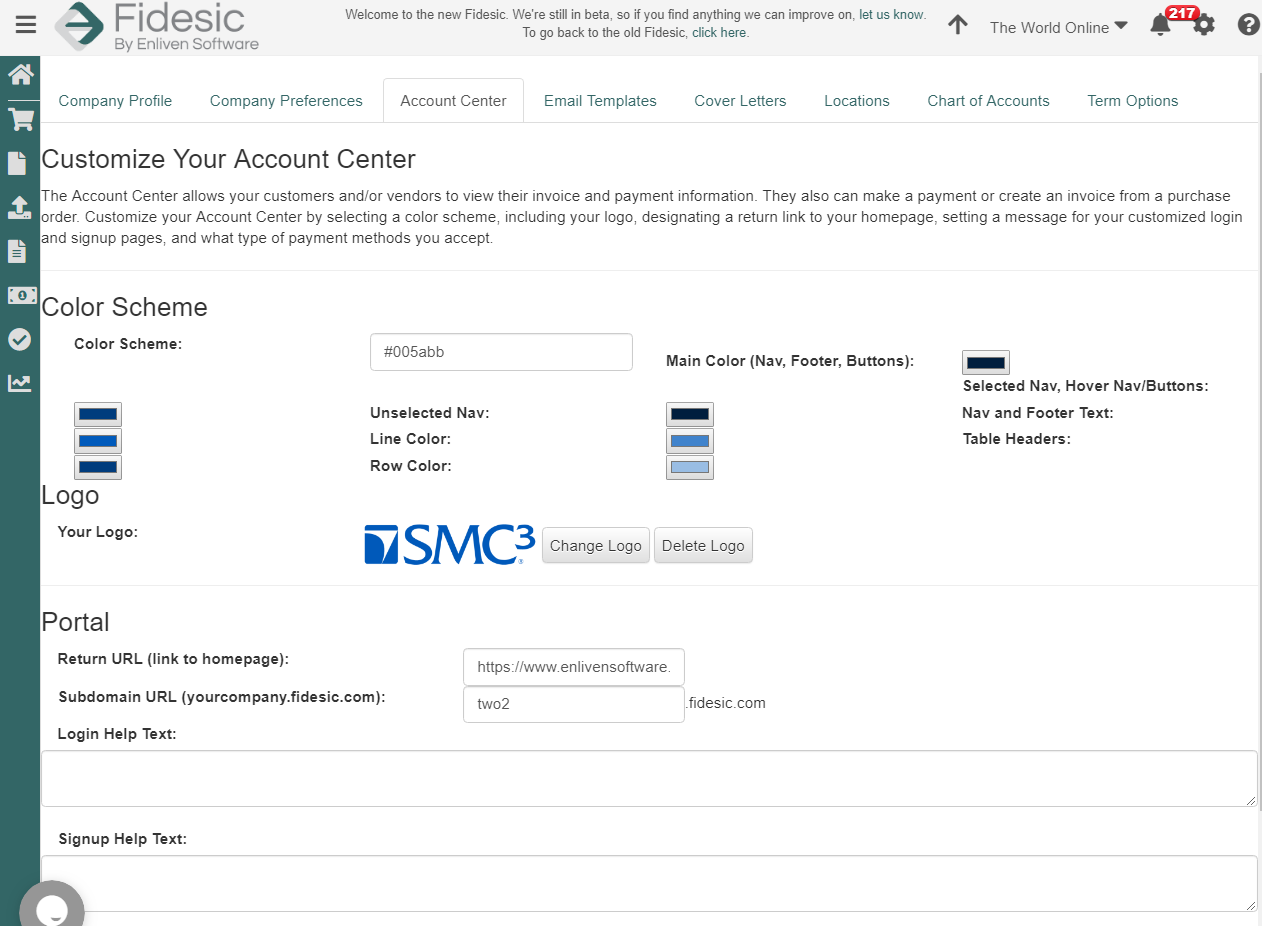
Account Center
Selecting the “Account Center” tab displays the “Customize Your Account Center” screen, shown below, determines how your site looks and feels. You can set up a “Color Scheme” and attach a “Logo.” Within the “Portal” section of the screen, you can set your “Subdomain,” which will determine how you access your own specific “Login.” Additionally, you can set the “Return URL,” which will take a user to a specific page when the “Log Out”; for example, your own company homepage.
Vendor Lists
Vendor lists can be uploaded directly to our site. If you are using dynamics GP, please install the vendor sync module using vendor sync installation instructions.
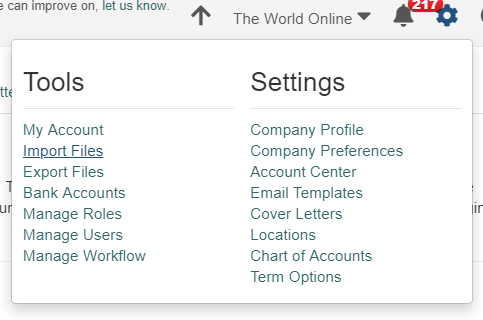
To manually upload vendors, navigate to “import files”
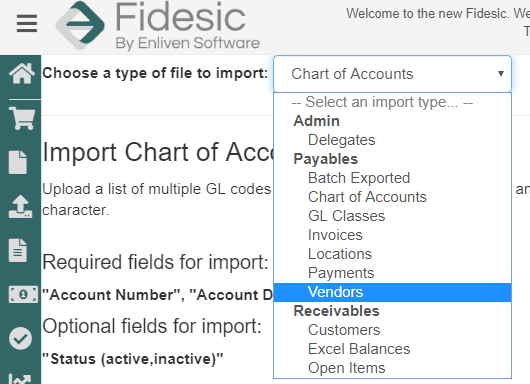
Select “Vendors” from the drop-down menu.
From this page, you can import vendor lists directly into Fidesic. Please make sure that column names match exactly the required fields listed on this page.
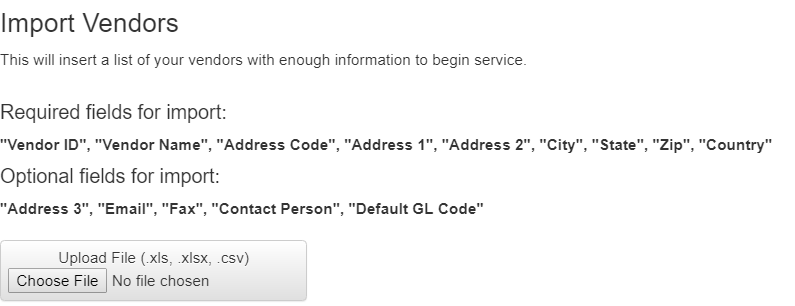
Chart of Accounts
For Dynamics GP Users, please follow the Vendor Sync module installation instructions. This will sync all Gls and Vendors directly from Dynamics GP into Fidesic.
Selecting the “Chart of Accounts” tab displays the “Chart of Accounts” screen, shown below. These setting will be synced to your account during the initial setup.

GL Codes can be manually added by hitting “Add” and adding them individually.
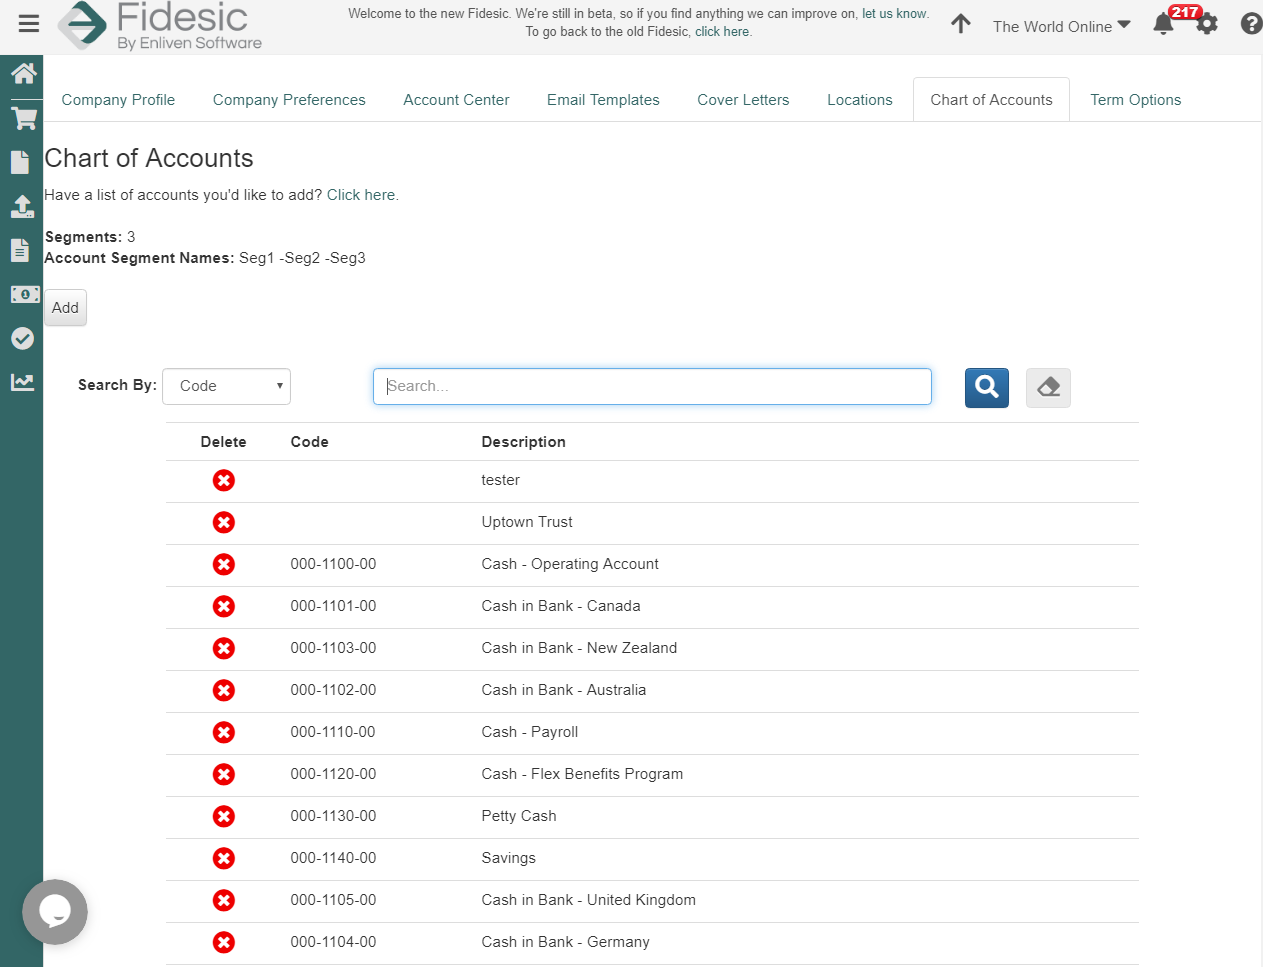
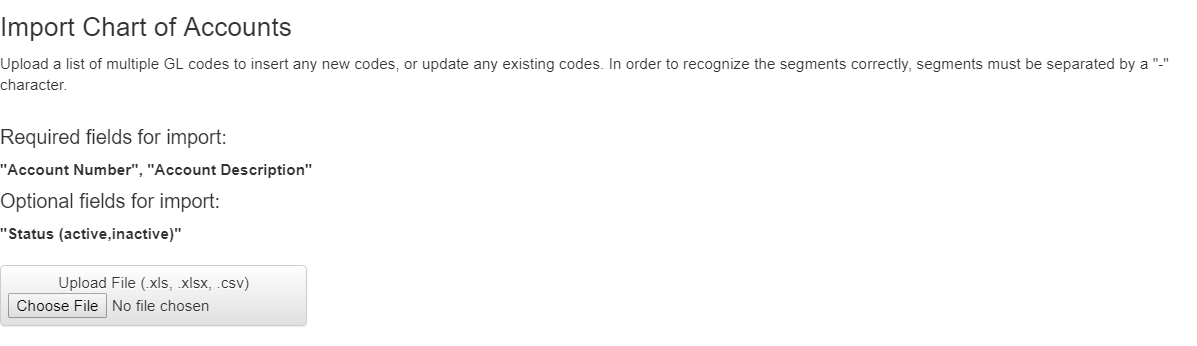
You can also upload a spreadsheet of GL codes by clicking on “click here” and providing a properly formatted spreadsheet for upload.
Term Options
For Dynamics GP Users, please follow the Vendor Sync module installation instructions. This will sync all Gls, Vendors, and Terms directly from Dynamics GP into Fidesic.
Selecting the “Term Options” tab displays the “Invoice Term Options” screen, shown below.
This will also be synced to your account at the time of initial setup, but you can delete individual options on this screen, if necessary. Please note that any changes to these terms will affect all users within your company.
Creating Dropbox Addresses
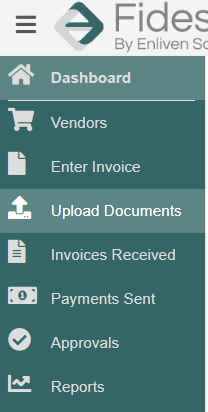
Selecting the “Upload Documents” option on the “Navigational” menu at the left-hand side of the screen, as shown in the following illustration, allows you to add a “Dropbox “Email Address” that you can submit documents to.
The following screen is displayed. You can enter an “Email Address” to send “Invoices” to your “Entry Queue,” and an “Email Address” to use for “OCR Processing” when sending “Invoices.” Sent documents are stored in Your “Queue,” and the second “Email Address” that you configure will be sent to Fidesic for direct processing and will be captured automatically.

Display after the email address has been set.

Picking Role Permissions
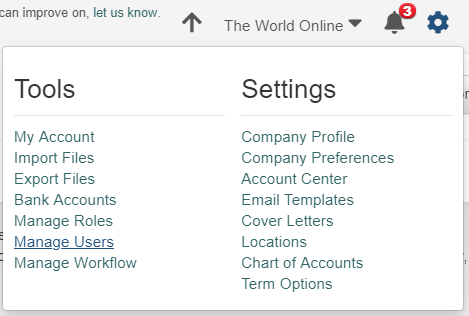
To manage the “Roles” within your account, select the “Manage Roles” option on the “Tools” menu, as shown in the following illustration.
The “Roles” screen, shown below, is displayed. The “Roles” shown on the “Roles” list are what control “Permissions” within the system.
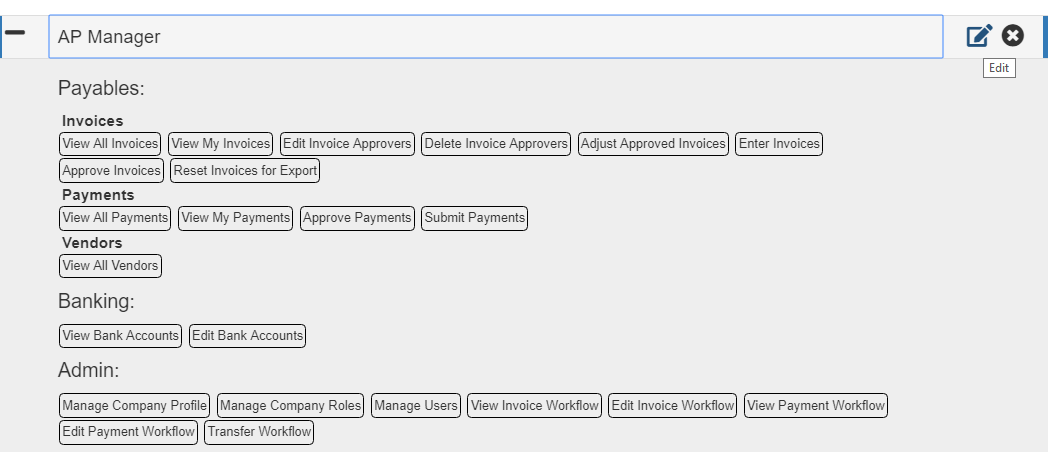
Selecting a “Role” on the “Roles” list allows you to make modifications to that “Role,” as shown in the following illustration.
You can add a “Role” by clicking “Add Role,” as shown in the following illustration.
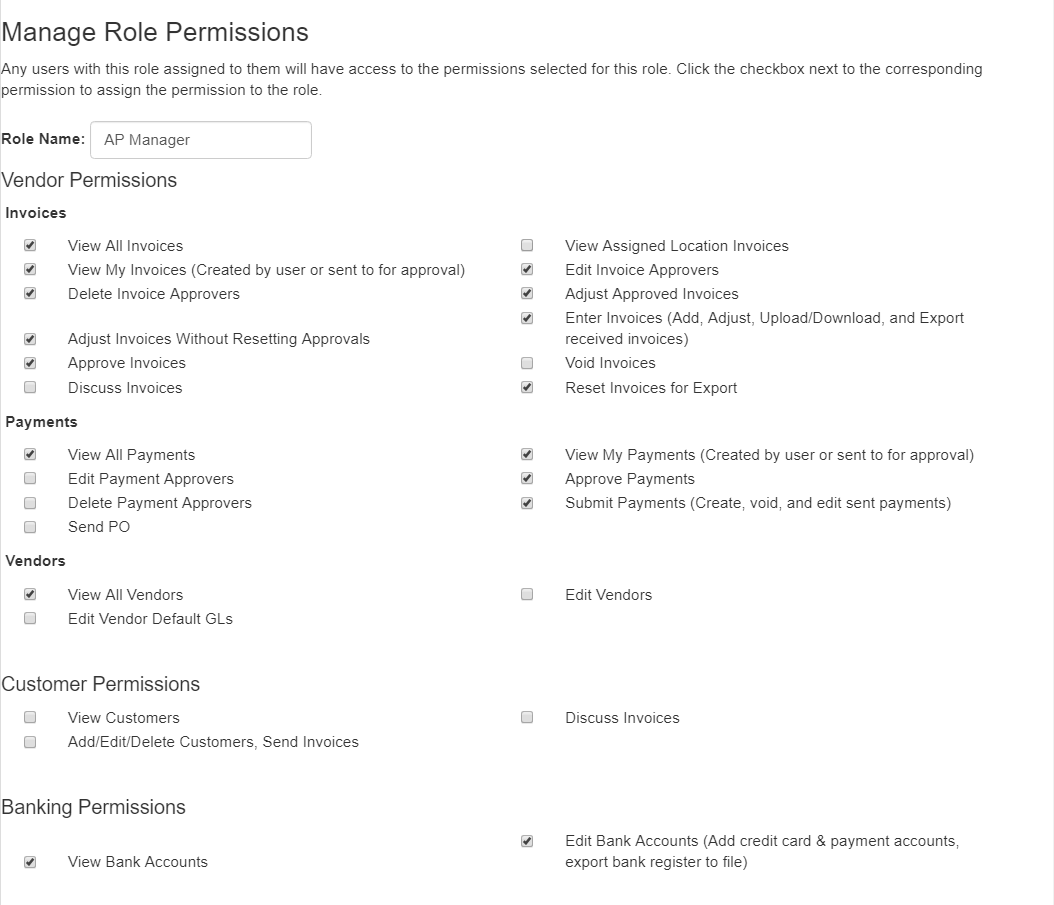
The “Manage Role Permissions, screen, shown below, is displayed. Enter a name for the “Role” in the “Role Name” field, and then select the “Invoices,” “Payments,” “Vendors,” “Banking Permissions,” and “Admin Permissions” options that you want to assign to the “Role.”
You can also configure a “Role’s” “Email Settings” within the “Manage Role Email Settings” portion of the screen, as shown in the following illustration, which is how you control “Notifications” from our system.
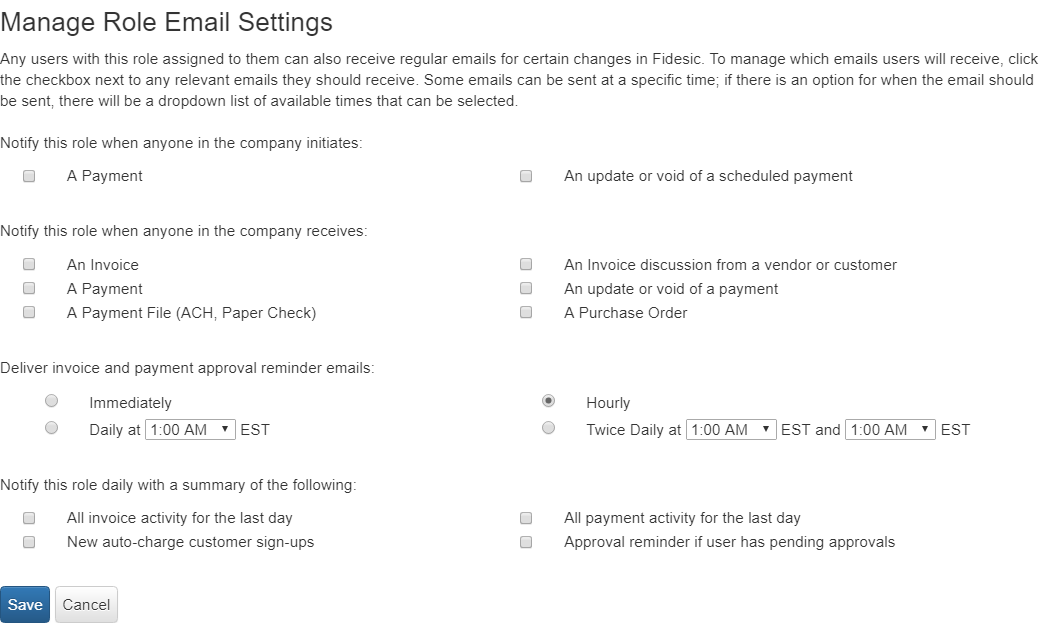
An important function here is setting the frequency at which you send out “Reminders,” as shown in the following illustration.
Additionally, the “Notify this role daily with a summary of the following” option on this screen allows you to configure site-wide “Notifications”
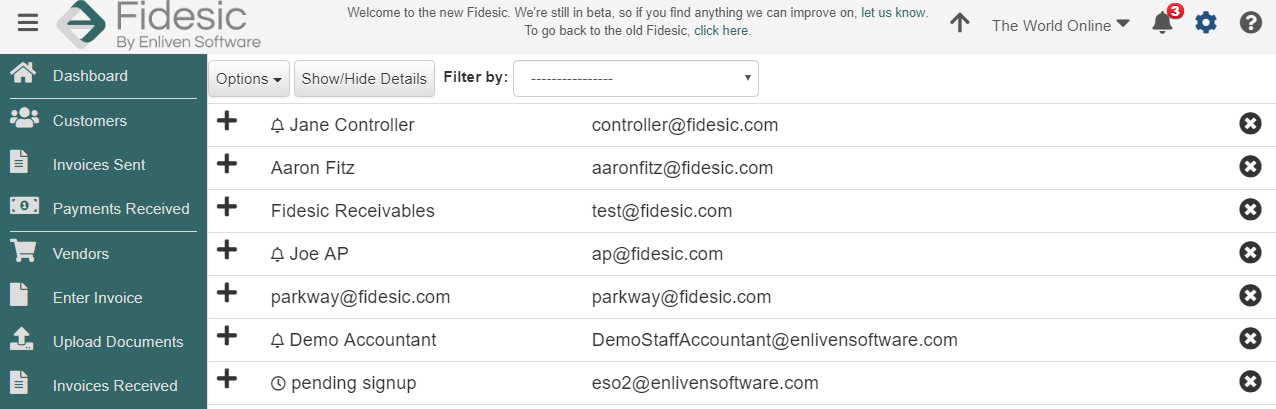
Adding Users
Selecting the Manage Users” option on the “Tools” menu, as shown in the illustration below, allows you to add additional “Users” to the system.

The “Users” screen, shown below, is displayed.
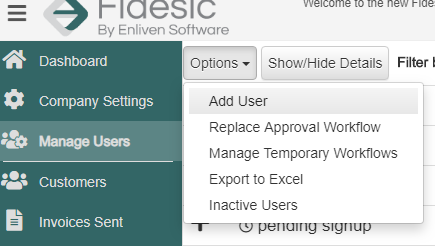
To Add a User, select options and "Add User".
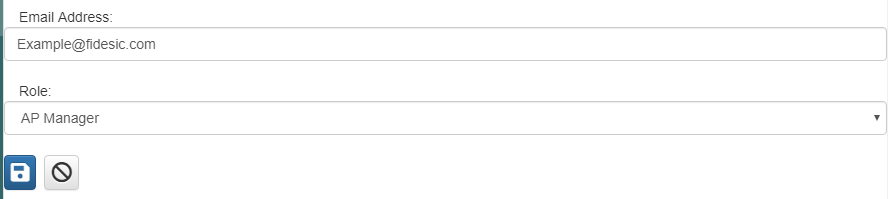
Enter their Email address and select their Role.
Adjusting Users
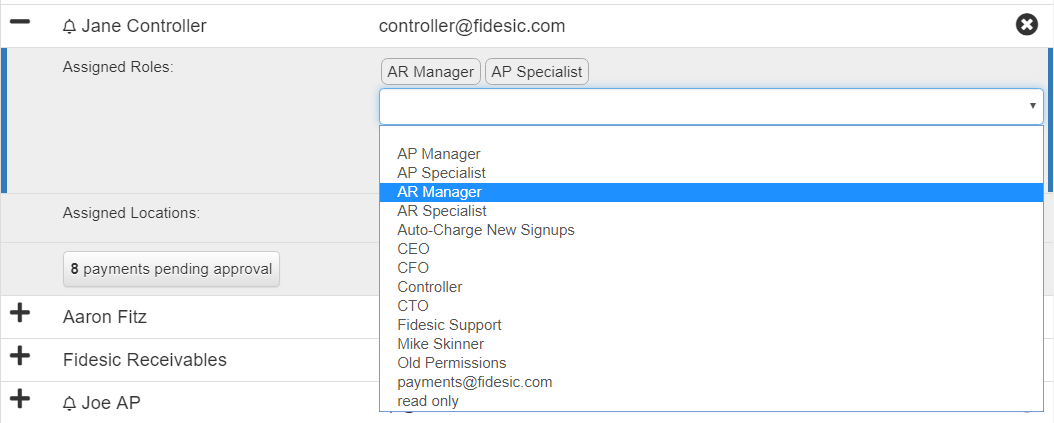
Selecting a “User” on the “Users” list displays the “Roles” that have been assigned to that “User,” as shown in the following illustration.
You can assign additional “Roles” to a “User” by clicking the “+” icon. As shown in the following illustration, a “Roles” drop down is displayed, from which you can assign the “User” that “Role,” including the “Email Permissions” and “Visibility Permissions” associate with the “Role.”
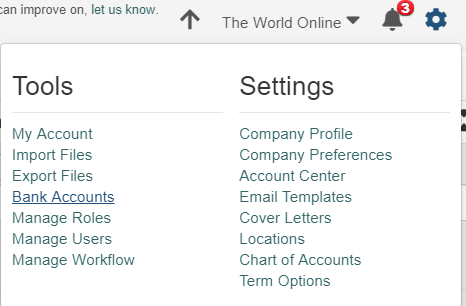
Adding Banking Information
To add a “Bank Account” to the system, select the “Bank Accounts” option on the “Tools” menu, as shown in the following illustration.
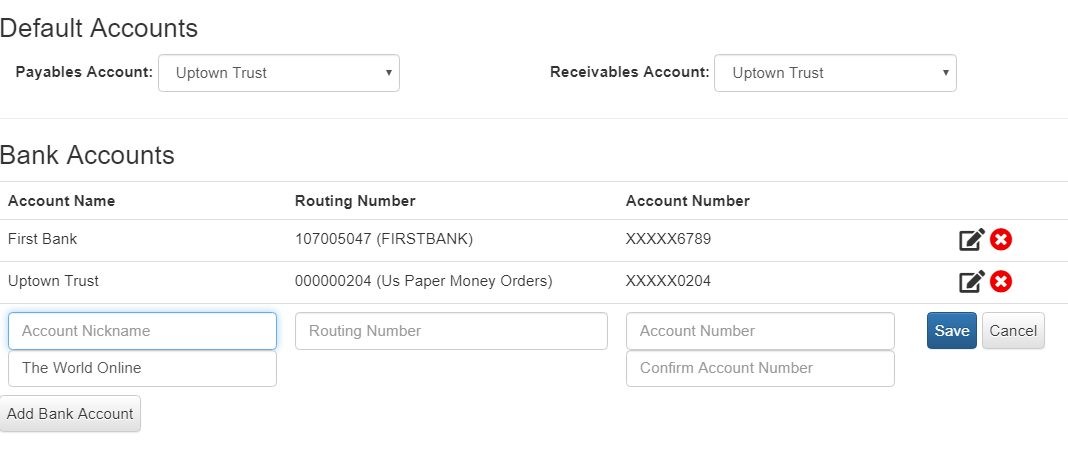
The “Bank Accounts” screen, shown below, is displayed. The “Account Nickname,” “Routing Number,” Account Number,” and “Confirm Account Number” fields are “Required” fields. The system will automatically indicate that the account is valid, if the entries you have made are correct.
This page also allows you to set default Payables and Receivables accounts from the added bank accounts.
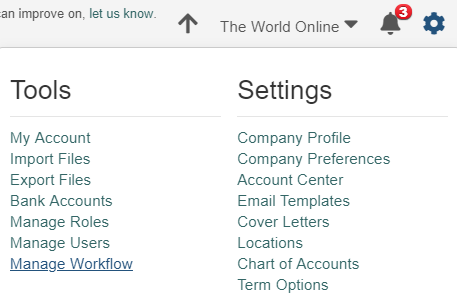
Building Workflow
Building a “Workflow” is a fairly complex process, and we encourage you to contact us for help if you run into problems with this system functionality. This section of the document will show you how it is done. To begin the process, click the “Settings” icon, and then select the “Manage Workflow” option on the “Tools” menu, as shown in the following illustration.
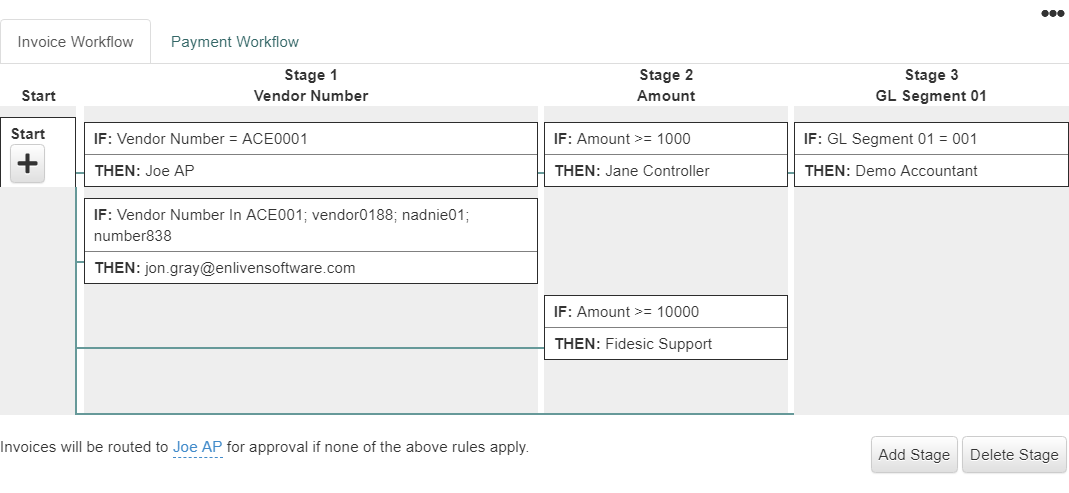
The following screen is displayed. Notice that there are two type of “Workflows” that you can build: one for “Invoices” and one for “Payments.” A “Workflow” is based on stages; essentially, different levels of approval. To add a “Stage” to this “Workflow,” click the “Start” button.
As shown in the following illustration, the “Add Rule” dialog is displayed. As you can see, the “Stage” checkbox is selected by default. You’ll need to create an “If/Then” condition to create a rule for this stage. Enter the “IF Statement” in the “IF” box, and then select the “Approve By” checkbox, and click the “Add Additional Approver to Rule” button. A “Role” list will be displayed, as shown in the following illustration.
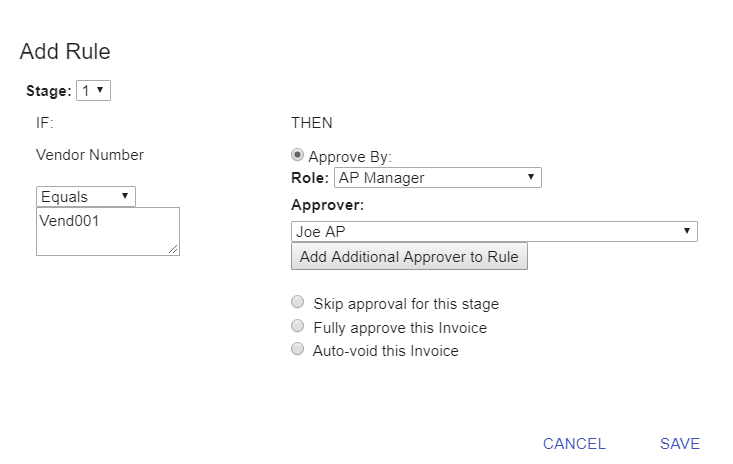
Next, select an “Approver” from the “Approver” drop-down, as shown in the above illustration.
As shown in the illustration above, you also have the option of selecting the “Skip approval for this stage” checkbox, the “Fully approve for this stage” checkbox and/or the “Auto-void this Invoice” checkbox to indicate your preference for this “Rule.”
When finished, click “Save.”