![fidesic-logo-300px-2023-2.png]](https://help.fidesic.com/hs-fs/hubfs/fidesic-logo-300px-2023-2.png?height=40&name=fidesic-logo-300px-2023-2.png)
When an invoice comes in with no PO, Fidesic treats it as a non-PO invoice, and your workflow may approve it like any other. If the vendor normally bills against purchase orders, that's usually a sign the PO number was missed. The PO Expected condition catches these invoices, so you can send them to an approver who can add the PO or confirm the invoice doesn't need one.
Who can do this: users who can edit the Approval Workflow add the rule. Users whose role has Manage Company Profile set the look-back, and users whose role has Edit Vendors set a vendor's Expect PO. Your company must have Enable Purchase Order functionality turned on.
When an invoice is PO Expected
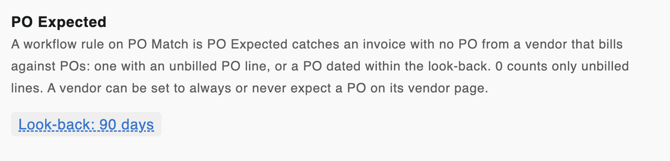
An invoice is PO Expected when it has no PO and no PO number, and its vendor bills against POs. By default, a vendor bills against POs when it has either:
- a PO with a line that hasn't been fully invoiced yet, or
- a PO dated within the look-back, 90 days unless you change it.
A few invoices are never PO Expected:
- Credit memos and returns.
- An invoice with a PO number that doesn't match any PO. That's PO Not Found, which you can route with its own rule.
- An invoice on a PO that's closed. That's PO Closed.
Canceled POs and draft POs don't count. A PO closed in your accounting system has no open lines, but its date still counts toward the look-back.
Adding the rule
- Go to Settings → Users & Permissions → Approval Workflow.
- If you don't have a PO Match stage yet, click Add Stage and add one.
- Click Add Rule, pick your PO Match stage, and choose PO Expected. It takes no value.
- Choose Approve By and the approver who should look at these invoices, such as your AP team, and save.
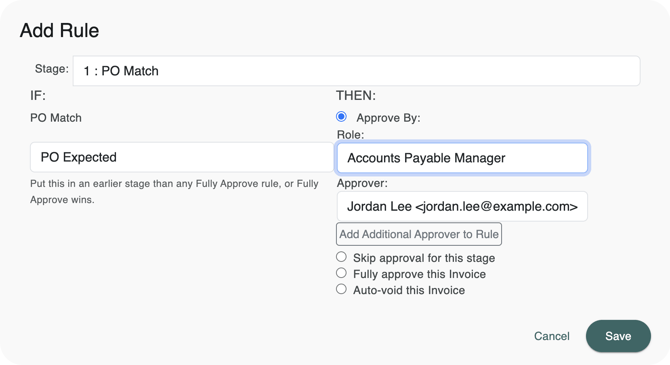
Put it in an earlier stage than any Fully Approve rule
Workflow acts on the earliest stage where a rule matches. If that stage also has a rule that fully approves the invoice, the invoice is approved, and the PO Expected rule's approver is never asked. So put your PO Expected rule in a stage before any stage with a Fully approve rule that could match the same invoice. The rule editor reminds you when you choose PO Expected.
Setting how far back Fidesic looks
- Go to Settings → Company → Preferences, and open Purchase Orders.
- Under PO Expected, click Look-back, enter a number of days, and click the check mark to save.
A vendor whose newest PO is dated within that many days counts as billing against POs, even when all of its POs have been fully invoiced. Set it to 0 to count only POs with lines still open. A change applies the next time workflow runs on an invoice.
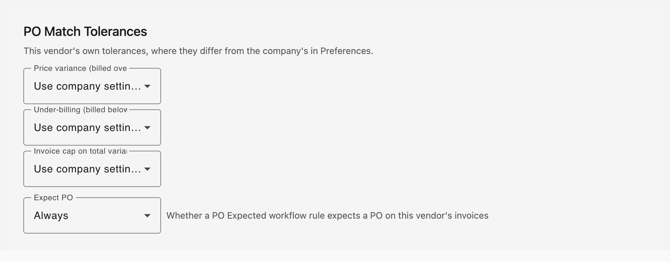
Setting a vendor to always or never expect a PO
Some vendors always bill against a PO, even though their POs are rare. Others have POs but also send invoices that never need one. You can set either on the vendor:
- Open the vendor, and on the Vendor Details tab click to edit it.
- Under PO Match Tolerances, choose Expect PO:
- Default: by its PO history: the vendor's POs and the look-back decide, as described above.
- Always: every invoice from this vendor with no PO is PO Expected, even with no PO history.
- Never: no invoice from this vendor is PO Expected.
The setting is saved as soon as you choose it, separately from the rest of the vendor, so a vendor sync from your accounting system doesn't overwrite it.
What the approver sees
On a PO Expected invoice, a banner at the top of the invoice says why, for example:
- "This vendor has 4 open POs. No PO was found on this invoice."
- "This vendor's last PO was dated 9/12/2026. No PO was found on this invoice."
- "This vendor is set to always expect a PO."
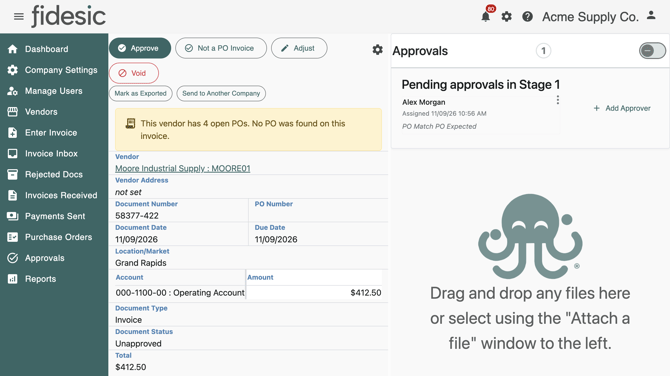
The approver can then:
- Add the PO, by entering the PO number or importing the lines from the PO, and save. The banner goes away, and the invoice follows the rest of your workflow, including PO match.
- Approve it as not a PO invoice: click Not a PO Invoice, say why it doesn't need a PO, and click Approve. The note is required, and is saved in the invoice's history as "Not a PO invoice: " followed by what they wrote.
- Approve or reject it as usual.
The banner and the Not a PO Invoice button only appear when your workflow has a PO Expected rule.