![fidesic-logo-300px-2023-2.png]](https://help.fidesic.com/hs-fs/hubfs/fidesic-logo-300px-2023-2.png?height=40&name=fidesic-logo-300px-2023-2.png)
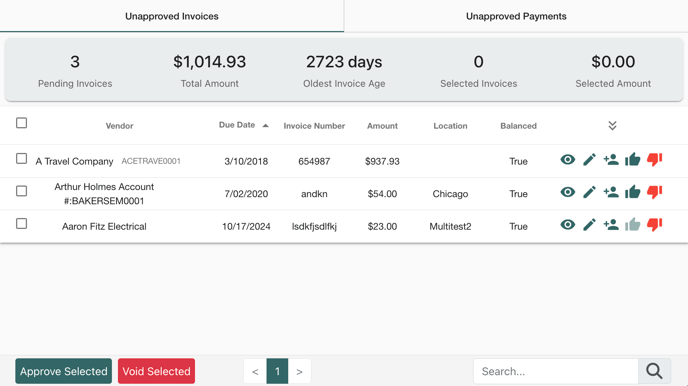
The Invoice Approval page lists all invoices currently pending your approval. Once fully approved, invoices are available to sync to your ERP system and be paid. The page is divided into three sections: Dashboard, Invoice List, and Footer — each described below.
Dashboard
The Dashboard appears at the top of the page, above the invoice list. It displays:
- A count and total sum of all invoices pending your approval
- How many days the oldest invoice in your queue has been outstanding
- A count and total sum of the invoices currently selected
Invoice List
This is the list of invoices that are currently pending your approval. If you need to change the order of the invoices, you can click on the table headers to do so. Fidesic will remember your selected search order as well, so it will stay sorted by your preferred type the next time you need to approve invoices as well. There is also an icon at the right of the table headers to show/hide more information on the invoices, including the associated GL codes and attachments.
This table includes basic information about the invoices, including vendor, due date, invoice number, and amount. There is also a Balanced column. A value of True indicates that the sum of the GL code allocations equals the total invoice amount. If these two amounts do not match, the column displays False, indicating that adjustments need to be made before the invoice can be processed.
To approve invoices, you can either click the "thumbs up" icon on the right side of the invoice, or you can select multiple and click "Approve Selected" at the bottom. These steps apply if you want to void any invoices as well so they will not process; simply click the "thumbs down" icon or select multiple and click "Void Selected".
Additional actions are available on each invoice row:
- Vendor details: Hover over the vendor name or number to reveal a link to the vendor detail page.
- Detailed view: Click the detail icon on the right of the row to open the full invoice view.
- Edit invoice: Click the edit icon on the right of the row to modify the invoice.
- Add approver: Click the add-approver icon to assign an additional approver. You can include a message to that user; the recipient can view it from this page or from the detailed invoice view.
Footer
The footer is fixed to the bottom of the page so its controls are always accessible. It contains three areas:
- Approve selected / Void selected: After selecting one or more invoice checkboxes, click the appropriate button to process them in bulk.
- Pagination: By default, a set number of invoices is displayed per page. Use the pagination controls to navigate to additional pages when more invoices are pending your approval.
- Search: The search box at the far right filters invoices by text across all pages, not just the current page.