![fidesic-logo-300px-2023-2.png]](https://help.fidesic.com/hs-fs/hubfs/fidesic-logo-300px-2023-2.png?height=40&name=fidesic-logo-300px-2023-2.png)
To get to the "Customize Account Center" page, go to Settings → Company → Account Center. Please note that you will need admin permissions to access this page.
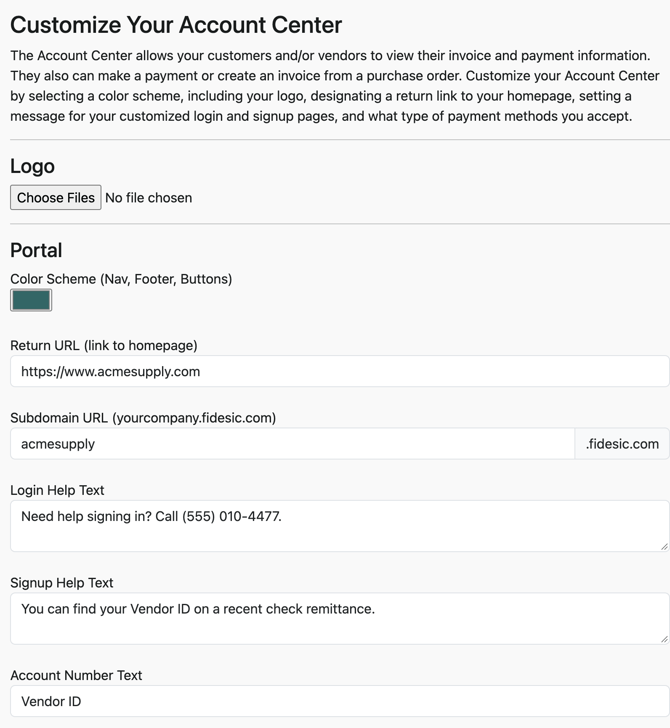
Logo
This will allow you to upload your company's logo. Vendors/customers will see this on the login page and at the top left when logged in.
Portal
From here, you can set the color scheme that will be used. This will affect the color of the sidebar, buttons, etc.
Return URL
When a user logs out, this is the page that they will be routed to.
Subdomain URL
This setting allows you to set a custom subdomain for your company for vendors/customers to access. When using this custom subdomain, users will be able to see your custom branding on the login page, as well as the link to register their account. This can be set in the format of subdomain.fidesic.com.
Login Help Text
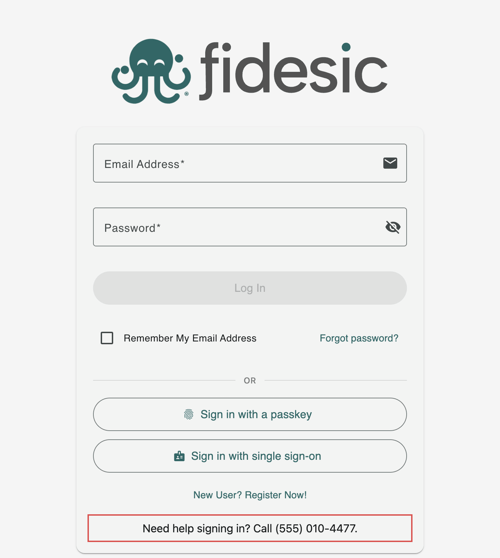
This is an optional field that can be set to provide additional information to your vendors/customers on the login page. When set, it will display the set text at the bottom of the login page. We do support adding HTML formatting such as <b> and <i>, as well as hyperlinks.
 Signup Help Text
Similarly to Login Help Text, this will allow you to set a custom message that will be displayed at the top of the Signup page that can be accessed when clicking the "New User? Register Now!" link. This similarly supports HTML formatting and hyperlinks.
Account Number Text
On the signup page, the account number field is labeled "Account Number" by default. However, if there is a different verbiage you would like to use, this can be managed from here.
Payment Options
If your customers pay you through Fidesic, the Payment Options (accepted methods of payment) section lets you choose which methods they can pay with: Check (ACH), Visa, MasterCard, Discover and American Express.
Choose the page they open on
You can choose the page your customers and vendors open on after they sign in. Go to Settings → Company → Preferences and find the Account Center section.
- Landing Page: the page they open on each time they sign in, and when they click your logo.
- First Sign-In Page: the page they open on the first time they sign in to your Account Center, such as Payment Account so they set up how they pay before anything else. After that, they open on the Landing Page. People who were already using your Account Center when this setting arrived count as signed in, so it only applies to new users.
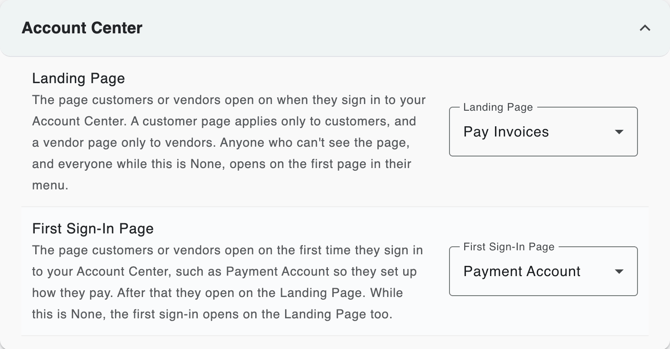
Each list has a Customers group and a Vendors group. You'll see the groups for the account centers your company has. Each setting holds one page, so it applies to either your customers or your vendors: a customer page only to customers, a vendor page only to vendors. The others open on the first page in their menu.
When the setting is None, or someone can't see the page you chose (for example, Payment Account when you don't take payments from them), they open on the first page in their menu, as before. If someone's first sign-in comes from a link, such as one to an invoice in an email, they open that page instead.